CSDN地址:https://blog.csdn.net/Eclipse_2019/article/details/126330966
学习目标- 理解Zookeeper的核心功能
- 理解Zookeeper的数据模型和znode结构
- 掌握Zookeeper在不同操作系统上的部署
ZooKeeper是一个分布式的,开放源码的分布式应用程序协调服务,是Google的Chubby一个开源的实现,是Hadoop和Hbase的重要组件。它是一个为分布式应用提供一致性服务的软件,提供的功能包括:配置维护、域名服务、分布式同步、组服务等。
ZooKeeper的目标就是封装好复杂易出错的关键服务,将简单易用的接口和性能高效、功能稳定的系统提供给用户。它包含一个简单的原语集,提供JAVA和C的接口。ZooKeeper代码版本中,提供了分布式独享锁、选举、队列的接口,代码在$zookeeper_home\src\recipes。其中分布锁和队列有Java和C两个版本,选举只有Java版本。
上面是百度百科对Zookeeper的解释,实际上,Zookeeper就是一个第三方的存储软件,它是一个独立的项目,相当于一个上帝视角,站在上帝的角度为我们的业务系统提供数据存储(比如注册中心和配置中心的功能),已经动态监听的功能(当zk上的数据发生变化,它会通过watch机制告诉我们的业务系统)。
通过上面的介绍,我相信大家应该能对Zookeeper(后面统一称为zk)有个大概的认识,那我们接着来聊一聊它作为一个上帝,要提供哪些核心功能:
- 首先它要存储数据,所以它必须提供一个数据结构去存储。至于它的数据结构是什么样的后面会讲。
- 数据存储上来之后,当数据发生变化,我得告知业务系统。怎么告知,什么时候告知,告知哪些业务系统都得考虑,这里怎么告知肯定是通过网络通信协议去做的,什么时候告知是通过watcher机制去观察的,告知谁是在我们zk上有个sessIOn保存我要告知的业务系统的。
- 因为zk是用在分布式系统上的,为了保证高可用性,zk通常也会做集群,那zk做集群的话也会牵扯到数据一致性,怎么保证zk的每个节点数据是同步的呢?后面也会讲解,大家别慌。
OK,以上就是zk要实现的核心功能,围绕着这三个核心功能,我们再去分析原理,推导核心流程,这样我相信大家就不会觉得在学习过程中一头雾水了。
一步步来,我们现在认识zk是个什么玩意儿了,然后再浅尝辄止认识认识它的整体结构,最后这篇文章我们再搭建一下zk的服务玩一下它的api。那本文就算达到目的了。当我们熟悉了它的使用,再去掌握它的原理,那这块技术才算拿下。
1.2 数据结构zookeeper 提供的名称空间非常类似于标准文件系统,key-value 的形式存储。名称 key 由斜线 / 分割的一系列路径元素,zookeeper 名称空间中的每个节点都是由一个路径标识。

节点除了存储数据内容以外,还存储了数据节点本身的一些状态信息,通过get命令可以获得状态信息的详细内容,如图所示。
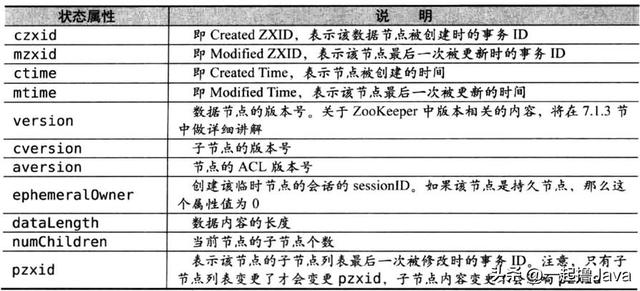
版本-保证分布式数据原子性。zookeeper为数据节点引入了版本的概念,每个数据节点都有三类版本信息,对数据节点任何更新操作都会引起版本号的变化,版本有点和我们经常使用的乐观锁类似。这里有两个概念说一下,一个是乐观锁,一个是悲观锁。
悲观锁:是数据库中一种非常典型且非常严格的并发控制策略。假如一个事务A正在对数据进行处理,那么在整个处理过程中,都会将数据处于锁定状态,在这期间其他事务无法对数据进行更新操作。
乐观锁:乐观锁和悲观锁正好想法,它假定多个事务在处理过程中不会彼此影响,因此在事务处理过程中不需要进行加锁处理,如果多个事务对同一数据做更改,那么在更新请求提交之前,每个事务都会首先检查当前事务读取数据后,是否有其他事务对数据进行了修改。如果有修改,则回滚事务再回到zookeeper,version属性就是用来实现乐观锁机制的“写入校验”。
1.3.2 watcher机制zookeeper提供了分布式数据的发布/订阅功能,zookeeper允许客户端向服务端注册一个watcher监听,当服务端的一些指定事件触发了watcher,那么服务端就会向客户端发送一个事件通知。zookeeper提供以下几种命令来对指定节点设置监听。
- get [-s] [-w] path:监听指定path节点的修改和删除事件。同样该事件也是一次性触发。
get -w /node
# 在其他窗口执行下面命令,会触发相关事件
set /node 123
delete /node
- ls [-s] [-w] [-R] path : 监控指定path的子节点的添加和删除事件。
ls -w /node
# 在其他窗口执行下面命令,会触发相关事件
create /node/node1
delete /node/node1
注意: 当前命令设置的监听是一次性的,就是说一旦触发了一次事件监听,后续的事件都不会响应。当然我们可以通过重复订阅来解决
- stat [-w] path:作用和get完全相同。
- addWatch [-m mode] path # optional mode is one of [PERSISTENT, PERSISTENT_RECURSIVE] -default is PERSISTENT_RECURSIVE addWatch的作用是针对指定节点添加事件监听,支持两种模式
1)PERSISTENT,持久化订阅,针对当前节点的修改和删除事件,以及当前节点的子节点的删除和新增事件。
2)PERSISTENT_RECURSIVE,持久化递归订阅,在PERSISTENT的基础上,增加了子节点修改的事件触发,以及子节点的子节点的数据变化都会触发相关事件(满足递归订阅特性)
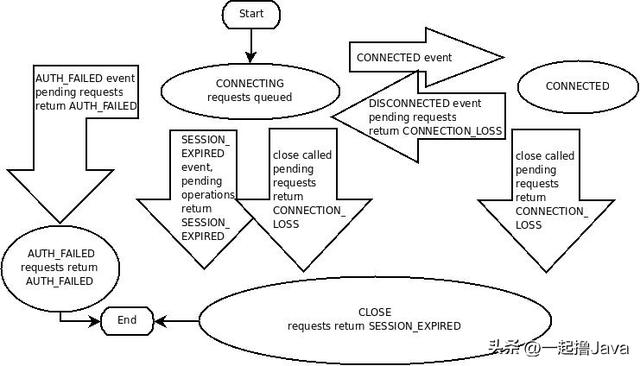
1.3.3 Session会话机制如图所示,表示Zookeeper的session会话状态机制。
- 首先,客户端向Zookeeper Server发起连接请求,此时状态为CONNECTING
- 当连接建立好之后,Session状态转化为CONNECTED,此时可以进行数据的IO操作。
- 如果Client和Server的连接出现丢失,则Client又会变成CONNECTING状态
- 如果会话过期或者主动关闭连接时,此时连接状态为CLOSE
- 如果是身份验证失败,直接结束
这里主要介绍两种部署方式,一种是基于Windows的单机版,一种是基于Centos7的集群部署
1.4.1 Windows单机版1、下载
官网下载地址:https://archive.apache.org/dist/zookeeper/zookeeper-3.4.13/

2、安装步骤
- 解压到D盘根目录

- 在zookeeper-3.4.13目录下创建一个data文件夹

- 进入conf文件夹,将conf目录下的zoo_sample.cfg文件重命名为zoo.cfg,然后修改zoo.cfg配置文件
# The number of milliseconds of each tick
tickTime=2000
# The number of ticks that the initial
# synchronization phase can take
initLimit=10
# The number of ticks that can pass between
# sending a request and getting an acknowledgement
syncLimit=5
# the directory where the snapshot is stored.
# do not use /tmp for storage, /tmp here is just
# example sakes.
#修改路径
dataDir=D:\\zookeeper-3.4.13\\data
#dataLogDir=dataDir=D:\\zookeeper-3.4.13\\log
# the port at which the clients will connect
clientPort=2181
# the maximum number of client connections.
# increase this if you need to handle more clients
#maxClientCnxns=60
#
# Be sure to read the maintenance section of the
# administrator guide before turning on autopurge.
#
# http://zookeeper.apache.org/doc/current/zookeeperAdmin.html#sc_maintenance
#
# The number of snapshots to retain in dataDir
#autopurge.snapRetainCount=3
# Purge task interval in hours
# Set to "0" to disable auto purge feature
#autopurge.purgeInterval=1
- 进入bin目录修改zkEnv.cmd
set ZOOCFGDIR=%~dp0%..\conf
set ZOO_LOG_DIR=%~dp0%..
set ZOO_LOG4J_PROP=INFO,CONSOLE
#增加下面两条
set JAVA=D:\Program Files (x86)\jdk1.8.0_111\bin\java
set JAVA_HOME=D:\Program Files (x86)\jdk1.8.0_111
- 启动zkServer.cmd
|
IP |
hostname |
部署资源 |
|
192.168.8.74 |
jt2 |
zookeeper |
|
192.168.8.75 |
jt3 |
zookeeper |
|
192.168.8.76 |
jt4 |
zookeeper |
1、修改主机名:
修改:vi /etc/hostname
三台服务器分别修改为jt2、jt3、jt4
重启:reboot
查看:hostname
2、配置名字解析IP:分别修改三台服务器的的/etc/hosts文件,添加如下映射:
192.168.8.74 jt2
192.168.8.75 jt3
192.168.8.76 jt4
3、重启:reboot
4、免密登录:生成秘钥:(jt执行)
执行ssh-keygen,一直按默认提示点击生成RSA密钥信息。

分发密钥至各机器节点
ssh-copy-id root@jt2
ssh-copy-id root@jt3
ssh-copy-id root@jt4

修改管理节点上的 ~/.ssh/config (当前用户目录下的.ssh/config)文件, 简化SSH远程连接时的输入信息:
管理节点是会有root和cuser多个用户, ssh远程连接默认会以当前用户身份进行登陆, 如果我们是root身份进行远程连接, 还是需要输入密码,我们可以修改配置 使用root远程连接时也不用输入密码。
切换root身份, su root
编辑config
vi ~/.ssh/config
添加如下内容:(这里的配置一定要注意前面的空格,否则会报错)
Host jt2
   Hostname jt2
   User root
Host jt3
   Hostname jt3
   User root
Host jt4
   Hostname jt4
   User root
修改文件权限:
chmod 600 ~/.ssh/config
如果没有权限的话:
先进入~目录:
cd ~
创建.ssh目录:
mkdir .ssh
创建config文件
vi config
禁用SELINUX:
vi /etc/selinux/config

SELINUX=disabled
5、互相免密
在其他两台服务器上重复上面的操作
1.4.2.2 zookeeper部署|
软件 |
版本 |
安装节点 |
下载地址 |
|
jdk |
jdk-8u321-linux-x64.tar.gz |
jt2、jt3、jt4 |
https://www.oracle.com/java/technologies/downloads/#java8 |
|
zookeeper |
apache-zookeeper-3.5.6-bin.tar.gz |
jt2、jt3、jt4 |
https://archive.apache.org/dist/zookeeper/zookeeper-3.5.6/ |
三台服务器都要操作
1、防火墙关闭
设置开机启用防火墙:systemctl enable firewalld.service
设置开机禁用防火墙:systemctl disable firewalld.service
启动防火墙:systemctl start firewalld
关闭防火墙:systemctl stop firewalld
检查防火墙状态:systemctl status firewalld
2、解压
tar -zxvf apache-zookeeper-3.5.6-bin.tar.gz
3、更改文件夹名称
mv apache-zookeeper-3.5.6-bin/ zookeeper
4、拷贝配置文件
cd /usr/local/jingtian/zookeeper/conf
cp zoo_sample.cfg zoo.cfg
vim zoo.cfg
# The number of milliseconds of each tick
tickTime=2000
# The number of ticks that the initial
# synchronization phase can take
initLimit=10
# The number of ticks that can pass between
# sending a request and getting an acknowledgement
syncLimit=5
# the directory where the snapshot is stored.
# do not use /tmp for storage, /tmp here is just
# example sakes.
dataDir=/usr/local/jingtian/zookeeper/data
# the port at which the clients will connect
clientPort=2181
# the maximum number of client connections.
# increase this if you need to handle more clients
#maxClientCnxns=60
#
# Be sure to read the maintenance section of the
# administrator guide before turning on autopurge.
#
# http://zookeeper.apache.org/doc/current/zookeeperAdmin.html#sc_maintenance
#
# The number of snapshots to retain in dataDir
#autopurge.snapRetainCount=3
# Purge task interval in hours
# Set to "0" to disable auto purge feature
#autopurge.purgeInterval=1
server.0=jt2:2888:3888
server.1=jt3:2888:3888
server.2=jt4:2888:3888
①、tickTime:基本事件单元,这个时间是作为Zookeeper服务器之间或客户端与服务器之间维持心跳的时间间隔,每隔tickTime时间就会发送一个心跳;最小 的session过期时间为2倍tickTime
②、dataDir:存储内存中数据库快照的位置,除非另有说明,否则指向数据库更新的事务日志。注意:应该谨慎的选择日志存放的位置,使用专用的日志存储设备能够大大提高系统的性能,如果将日志存储在比较繁忙的存储设备上,那么将会很大程度上影像系统性能。
③、client:监听客户端连接的端口。
④、initLimit:允许follower连接并同步到Leader的初始化连接时间,以tickTime为单位。当初始化连接时间超过该值,则表示连接失败。
⑤、syncLimit:表示Leader与Follower之间发送消息时,请求和应答时间长度。如果follower在设置时间内不能与leader通信,那么此follower将会被丢弃。
⑥、server.A=B:C:D
A:其中 A 是一个数字,表示这个是服务器的编号;
B:是这个服务器的 ip 地址;
C:Zookeeper服务器之间的通信端口;
D:Leader选举的端口。
我们需要修改的第一个是 dataDir ,在指定的位置处创建好目录。
第二个需要新增的是 server.A=B:C:D 配置,其中 A 对应下面我们即将介绍的myid 文件。B是集群的各个IP地址,C:D 是端口配置。
5、创建dataDir目录,这个目录的地址要跟zoo.cfg里面配的地址一致
mkdir data
6、在dataDir目录下创建myid文件
vi myid
然后在该文件中写入服务器编号,jt2服务器写0
7、配置环境变量
vi /etc/profile
export ZK_HOME=/usr/local/jingtian/zookeeper
export PATH=$PATH:$ZK_HOME/bin
8、执行:source /etc/profile
9、启动服务
启动:./zkServer.sh start
停止:./zkServer.sh stop
重启:./zkServer.sh restart
查看集群节点状态:./zkServer.sh status

批量启动
将zk.sh复制到/user/local/jingtian/目录下
执行:bash zk.sh start则就会启动
10、zk.sh
#!/bin/bash

case $1 in
"start"){
	for i in jt2 jt3 jt4
	do
		echo  ------------- zookeeper $i 启动 ------------
		ssh $i "/usr/local/jingtian/zookeeper/bin/zkServer.sh start"
	done
}
;;
"stop"){
	for i in jt2 jt3 jt4
	do
		echo  ------------- zookeeper $i 停止 ------------
		ssh $i "/usr/local/jingtian/zookeeper/bin/zkServer.sh stop"
	done
}
;;
"status"){
	for i in jt2 jt3 jt4
	do
		echo  ------------- zookeeper $i 状态 ------------
		ssh $i "/usr/local/jingtian/zookeeper/bin/zkServer.sh status"
	done
}
;;
esac
该模式运行的zookeeper
1、不参与选举。
2、不参与数据事务提交的ack应答。
配置方式如下
增加一个节点192.168.8.77(jt5)
在该节点的zoo.cfg中加入下面的配置
peerType=observer
server.0=jt2:2888:3888
server.1=jt3:2888:3888
server.2=jt4:2888:3888
#所有机器都需要配置这个
server.3=jt5:2888:3888:observer
最后一个配置 server.3=jt5:2888:3888:observer ,需要在所有节点都增加。
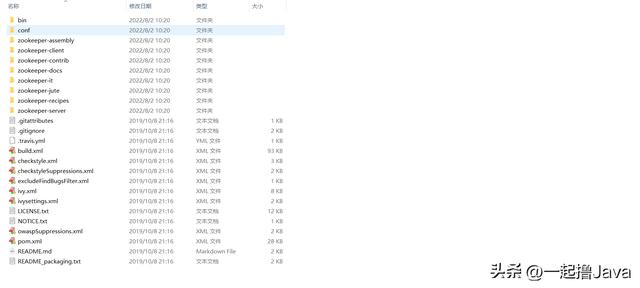
1.4.3 源码编译1.4.3.1 单机版源码下载地址:https://github.com/apache/zookeeper/tags?after=release-3.6.0-4
然后针对各个目录这里我来解释一下,先了解下 为下一章了解源码做个准备:
文件
说明
bin
包含访问zookeeper服务器和命令行客户端的脚本
conf
启动zookeeper默认的配置文件目录
zookeeper-assembly
基础服务打包目录
zookeeper-client
客户端,目前只支持c
zookeeper-contrib
附加的功能,比如zookeeper可视化客户端工具
zookeeper-docs
zookeeper文档
zookeeper-it
供fatjar使用,进行系统测试依赖的类
zookeeper-jute
zookeeper序列化组件
zookeeper-recipes
zookeeper提供的一些功能例子,包括选举election,lock和queue
zookeeper-server
zookeeper服务端
1、导入到ideal中
2、在zookeeper-server的resources目录下添加git.properties文件
#git提交id(随便编一个或者用github上的id)
git.commit.id=123123
#构建时间
build.time=2022-08-02
3、然后通过maven编译
4、复制配置文件
# The number of milliseconds of each tick
tickTime=2000
# The number of ticks that the initial
# synchronization phase can take
initLimit=10
# The number of ticks that can pass between
# sending a request and getting an acknowledgement
syncLimit=5
# the directory where the snapshot is stored.
# do not use /tmp for storage, /tmp here is just
# example sakes.
dataDir=/tmp/zookeeper
# the port at which the clients will connect
clientPort=2181
# the maximum number of client connections.
# increase this if you need to handle more clients
#maxClientCnxns=60
#
# Be sure to read the maintenance section of the
# administrator guide before turning on autopurge.
#
# http://zookeeper.apache.org/doc/current/zookeeperAdmin.html#sc_maintenance
#
# The number of snapshots to retain in dataDir
#autopurge.snapRetainCount=3
# Purge task interval in hours
# Set to "0" to disable auto purge feature
#autopurge.purgeInterval=1
5、修改zookeeper-server的pom文件
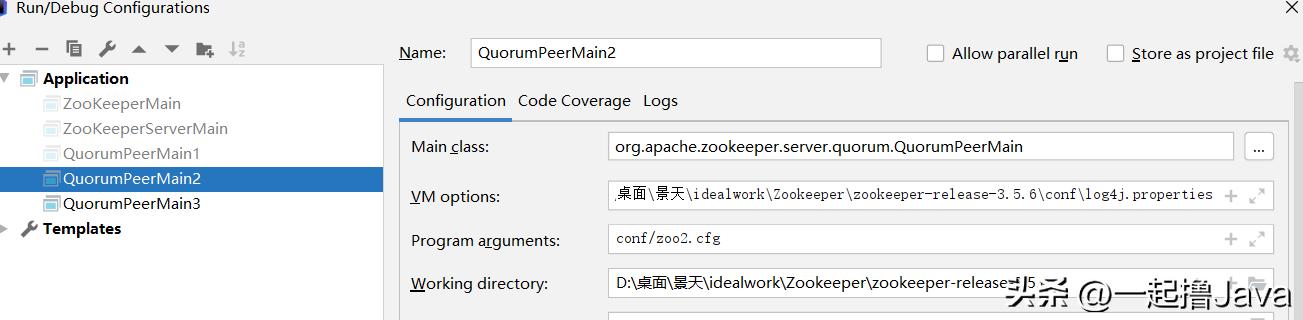
6、修改启动参数
VM options中是conf中log4j.properties文件的全部经
7、然后启动ZookeeperServerMain
源码的启动流程这里简单说一下
1、启动ZookeeperServerMain的main方法
public static void main(String[] args) {
    ZooKeeperServerMain main = new ZooKeeperServerMain();
	//核心流程
    main.initializeAndRun(args);
    ...
}
protected void initializeAndRun(String[] args)
    throws ConfigException, IOException, AdminServerException
{
    //核心流程
    runFromConfig(config);
}
public void runFromConfig(ServerConfig config)
    throws IOException, AdminServerException {

    // Start Admin server
    //启动服务管理器(JettyAdminServer)-启动Jetty
    adminServer = AdminServerFactory.createAdminServer();
    adminServer.setZooKeeperServer(zkServer);
    //这是启动Jetty容器
    adminServer.start();

    boolean needStartZKServer = true;
    if (config.getClientPortAddress() != null) {
        //cnxnFactory负责zk的网络请求,createFactory中
        //从系统配置中读取ZOOKEEPER_SERVER_CNXN_FACTORY,默认是没有这个配置的,因此默认是使用NIOServerCnxnFactory
        cnxnFactory = ServerCnxnFactory.createFactory();
        //0.0.0.0/0.0.0.0:2181,单个客户端连接数超过限制,请求的传入连接队列的最大长度,-1不限制
        cnxnFactory.configure(config.getClientPortAddress(), config.getMaxClientCnxns(), false);
        //这才是启动ZookeeperServer服务的核心逻辑
        cnxnFactory.startup(zkServer);
        // zkServer has been started. So we don't need to start it again in secureCnxnFactory.
        //是否需要启动Zookeeper服务,Zookeeper服务已经启动了,不需要再次启动,设置为false
        needStartZKServer = false;
    }

}
2、NIOServerCnxnFactory.startup
public void startup(ZooKeeperServer zks, boolean startServer) throws IOException, InterruptedException { //NIO启动对应线程,四种线程 start(); //设置Zookeeper的ServerCnxnFactory(客户端与服务端进行通信的对象,就是当前对象NIOServerCnxnFactory) setZooKeeperServer(zks); if (startServer) { //加载会话和数据 zks.startdata(); //启动Zookeeper服务,在这里会创建一个SessionTrackerImpl线程,并执行该线程 //这个线程就是用来管理Session的属性的 //同时也会构建核心业务调用链 zks.startup(); } }1.4.3.2 集群版
public synchronized void startup() { //创建Session的核心管理线程SessionTrackerImpl if (sessionTracker == null) { createSessionTracker(); } //启动SessionTrackerImpl线程 startSessionTracker(); //构建核心业务调用链 setupRequestProcessors(); registerJMX(); //设置zkserver的状态为运行 setState(State.RUNNING); notifyAll(); }1、在单机的基础之上增加启动类
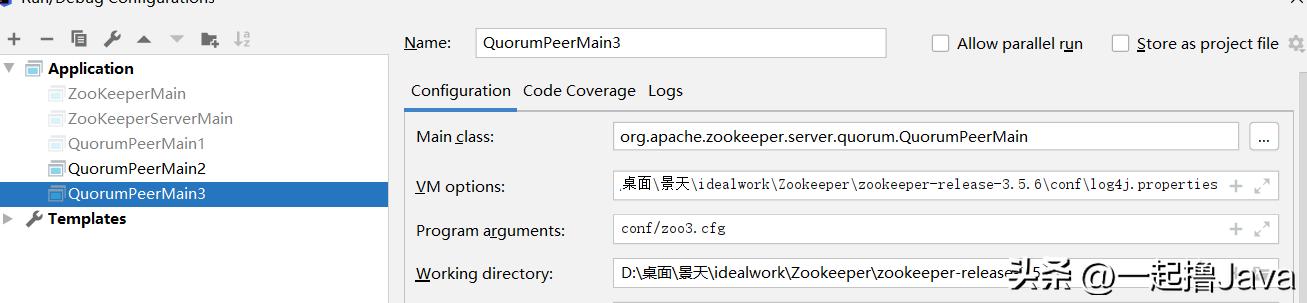
2、在conf目录下增加配置文件zoo1.cfg、zoo2.cfg、zoo3.cfg,配置如下
# The number of milliseconds of each tick
tickTime=2000
# The number of ticks that the initial
# synchronization phase can take
initLimit=10
# The number of ticks that can pass between
# sending a request and getting an acknowledgement
syncLimit=5
# the directory where the snapshot is stored.
# do not use /tmp for storage, /tmp here is just
# example sakes.
dataDir=D:/桌面/景天/idealwork/Zookeeper/zookeeper-release-3.5.6/data/zkdata1
# the port at which the clients will connect
clientPort=2181

#集群配置
server.1=127.0.0.1:12881:13881
server.2=127.0.0.1:12882:13882
server.3=127.0.0.1:12883:13883
# The number of milliseconds of each tick
tickTime=2000
# The number of ticks that the initial
# synchronization phase can take
initLimit=10
# The number of ticks that can pass between
# sending a request and getting an acknowledgement
syncLimit=5
# the directory where the snapshot is stored.
# do not use /tmp for storage, /tmp here is just
# example sakes.
dataDir=D:/桌面/景天/idealwork/Zookeeper/zookeeper-release-3.5.6/data/zkdata2
# the port at which the clients will connect
clientPort=2182

#集群配置
server.1=127.0.0.1:12881:13881
server.2=127.0.0.1:12882:13882
server.3=127.0.0.1:12883:13883
# The number of milliseconds of each tick
tickTime=2000
# The number of ticks that the initial
# synchronization phase can take
initLimit=10
# The number of ticks that can pass between
# sending a request and getting an acknowledgement
syncLimit=5
# the directory where the snapshot is stored.
# do not use /tmp for storage, /tmp here is just
# example sakes.
dataDir=D:/桌面/景天/idealwork/Zookeeper/zookeeper-release-3.5.6/data/zkdata3
# the port at which the clients will connect
clientPort=2183

#集群配置
server.1=127.0.0.1:12881:13881
server.2=127.0.0.1:12882:13882
server.3=127.0.0.1:12883:13883
3、建立zkdata1、zkdata2、zkdata3目录,并增加相应文件
4、启动QuorumPeerMain1、QuorumPeerMain2、QuorumPeerMain3
因为我的myid的目录是带有中文的,所以会报错
下文预告
for(Object key : cfg.keySet()){ Object value = cfg.get(key); cfg.put(key,new String(value.toString().getBytes("ISO8859-1"), "UTF-8")); },
- 了解Zookeeper原生核心API的使用
- 掌握Curator的使用