在使用 XML 方式配置 IoC 容器时,<Bean> 标签的 scope 属性可以指定 Bean 的作用域,如下所示。若不指定 scope 属性,则默认 scope="singleton",即单例作用域。
<bean id="xmlinstancesingleton" class="test.model.XMLInstance"
    scope="singleton">
    <property name="name" value="abc"/>
</bean>

<bean id="xmlinstanceprototype" class="test.model.XMLInstance"
    scope="prototype">
    <property name="name" value="abc"/>
</bean>
scope 属性值有下面 5 个可选,即 Spring Bean 的作用域 有 5 种
- singleton:唯一 Bean 实例,Spring 中的 Bean 默认都是单例的。
- prototype:每次请求都会创建一个新的 Bean 实例。
- request:每一次 HTTP 请求都会产生一个新的 Bean,该 Bean 仅在当前 HTTP request 内有效。
- session:每一次 HTTP 请求都会产生一个新的 Bean,该 Bean 仅在当前 HTTP session 内有效。
- global-session:全局 session 作用域,仅仅在基于 Portlet 的 web 应用中才有意义,Spring 5 已经没有了。Portlet 是能够生成语义代码(如 HTML)片段的小型 Java Web 插件。它们基于 portlet 容器,可以像 servlet 一样处理 HTTP 请求。但是,与 servlet 不同,每个 portlet 都有不同的会话。
在开发过程中,对有状态的 Bean 建议使用 Prototype,对无状态建议使用 Singleton。
单例模式的实现- 单例模式下,可以设置类的构造函数为私有,这样外界就不能调用该类的构造函数来创建多个对象。
- 单例模式下,可以设置 get 方法为静态,由类直接调用。
- 单例模式的类实现方法有「饿汉式」和「懒汉式」,如下代码所示。
//饿汉式
//singleton1作为类变量直接得到初始化,优点是在多线程环境下能够保证同步,不可能被实例化两次
//但是如果singleton1在很长一段时间后才使用,意味着singleton1实例开辟的堆内存会驻留很长时间,不能延迟加载,占用内存
public  class Singleton1{
    private static Singleton1 singleton1 = new Singleton1();

    public static Singleton1 getSingleton1(){
        return singleton1;
    }
}

//懒汉式
public  class Singleton2{
    private static Singleton2 singleton1 = null;

    public static Singleton2 getSingleton1(){
        if(singleton1 ==null){
            singleton1 = new Singleton2();
        }
        return singleton1;
    }
}
「懒汉式」是在使用的时候才去创建,这样可以避免类在初始化时提前创建。但是如果在多线程的情况下,因为线程上下文切换导致两个线程都通过了 if 判断,这样就会 new 出两个实例,无法保证唯一性。可以采用如下方式,规避这个问题(参考 Spring中Bean的单例及七种创建单例的方法)
1.懒汉式 同步
//使用 synchronized 关键字进行加锁
//添加同步控制后,getSingleton1()方法是串行化的,获取时需要排队等候,效率较低
public class Singleton3 {

    private static Singleton3 singleton1 = null;

    public synchronized Singleton3 getSingleton1() {
        if (singleton1 == null) {
            singleton1 = new Singleton3();
        }
        return singleton1;
    }
}
2.懒汉式 双重校验
// 若有两个线程通过了第一个check,进入第二个check是串行化的,只能有一个线程进入,保证了唯一性
public class Singleton4 {

    private static Singleton4 singleton1 = null;

    public static Singleton4 getSingleton1() {
        if (singleton1 == null) {
            synchronized (Singleton4.class) {
                if (singleton1 == null) {
                    singleton1 = new Singleton4();
                }
            }
        }
        return singleton1;
    }
}
如何注入 Prototype Bean,有两种方式
- XML 配置中指定 scope
<bean id="xmlinstanceprototype" class="test.model.XMLInstance"
    scope="prototype">
    <property name="name" value="abc"/>
</bean>
- 使用 @Scope("prototype") 注解
@Component
@Scope("prototype")
多例模式(Prototype)在进行注入时,不能使用 @Autowired,否则注入的还是单例模式。实现多例模式(Prototype)的注入,可以通过 ApplicationContext 的 getBean() 方法来获得 Bean,或者通过 BeanFactory 的 getBean() 方法来获得 Bean。
@Component
@Scope("prototype") //prototype
@Data
class User {
    private String name;
    private int age;
}

//@Autowired 获得依旧是单例 Bean
@SpringBootApplication
class SpringbootAppApplicationTest1{
    @Autowired
    private User user;

    public static void main(String[] args) {
        ApplicationContext context = new ClassPathXmlApplicationContext("beanConfig/BeanConfig.xml");

        //虽然 Bean 中使用了 @Scope("prototype"),但使用@Autowire注入
        //此处获得的 Bean 仍然是单例的
    }
}


//方式1
//ApplicationContext # getBean
@SpringBootApplication
class SpringbootAppApplicationTest2{

    public static void main(String[] args) {
        ApplicationContext context = new ClassPathXmlApplicationContext("beanConfig/BeanConfig.xml");
        //通过ApplicationContext的getBean方法获得Bean
        //user1 user2 user3 是三个不同的对象
        User user1 = (User)context.getBean("user");
        User user2 = (User)context.getBean("user");
        User user3 = (User)context.getBean("user");
    }
}


//方式2
//BeanFactory # getBean
@SpringBootApplication
class SpringbootAppApplicationTest2{

    @Autowired
    private org.springframework.beans.factory.BeanFactory beanFactory;

    public static void main(String[] args) {
        ApplicationContext context = new ClassPathXmlApplicationContext("beanConfig/BeanConfig.xml");
        //通过BeanFactory的getBean方法获得Bean
        //user1 user2 user3 是三个不同的对象
        User user1 = beanFactory.getBean(User.class);
        User user2 = beanFactory.getBean(User.class);
        User user3 = beanFactory.getBean(User.class);
    }
}
先来看一下什么是 Bean。
In Spring, the objects that form the backbone of your application and that are managed by the Spring IoC container are called beans. A bean is an object that is instantiated, assembled, and otherwise managed by a Spring IoC container. Otherwise, a bean is simply one of many objects in your application. Beans, and the dependencies among them, are reflected in the configuration metadata used by a container. -- What is Spring Bean | spring.io
在 Spring 中,构成应用程序主干,并由 Spring IoC 容器管理的对象称为「Bean」。「Bean」是一个由 Spring IoC 容器实例化、组装和管理的对象。
即 Spring Bean 的生命周期完全由 IoC 容器控制。需要注意的是,Spring 只帮我们管理单例模式 Bean 的完整生命周期,对于 prototype 的 Bean,Spring 在创建好交给使用者之后,则不会再管理后续的生命周期。
单例 Bean 在创建后,会被放入 IoC容器的缓存池中,并触发 Spring 对该 Bean 的生命周期管理。
生命周期的流程Spring Bean 的生命周期,可以简单粗略划分为(参考下述 doCreateBean 函数)
- 实例化(Instantiation)
- 属性赋值(Populate)
- 初始化(Initialization)
- 销毁(Destruction)
protected Object doCreateBean(String beanName, RootBeanDefinition mbd, @Nullable Object[] args) throws BeanCreationException {
    BeanWrapper instanceWrapper = null;
    if (mbd.isSingleton()) {
        instanceWrapper = (BeanWrapper)this.factoryBeanInstanceCache.remove(beanName);
    }

    if (instanceWrapper == null) {
        // 1. 实例化(Instantiation)
        instanceWrapper = this.createBeanInstance(beanName, mbd, args);
    }

    ...

    Object exposedObject = bean;

    try {
        // 2. 属性赋值(Populate)
        this.populateBean(beanName, mbd, instanceWrapper);
        // 3. 初始化(Initialization)
        exposedObject = this.initializeBean(beanName, exposedObject, mbd);
    } catch (Throwable var18) {
        ...
    }

    ...

    // 4.销毁(Destruction)
    // 注册回调接口
	this.registerDisposableBeanIfNecessary(beanName, bean, mbd);
	return exposedObject;
}
生命周期的扩展点
Bean 自身的方法(doCreateBean 函数)将 Bean 的生命周期划分为了实例化、属性赋值、初始化、销毁这 4 个阶段。但是 Spring 又对 Bean 的生命周期进行了扩展,细化后的生命周期过程如下。
初始化过程的扩展点和initializeBean方法
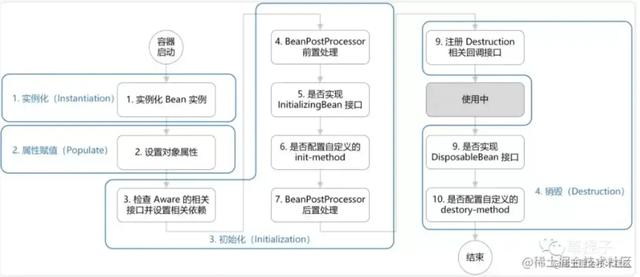
- 实例化(Instantiation) 图中的第 1 步,实例化一个 bean 对象
- 属性赋值(Populate) 图中的第 2 步,为bean对象设置相关属性和依赖
- 初始化(Initialization) 图中的第 3~7 步,其中第 5、6 步为初始化操作,第 3、4 步为在初始化前执行,第 7 步在初始化后执行。 检查 Aware 相关接口并设置依赖 BeanPostProcessor 前置处理 若实现了 InitializingBean 接口,则调用该接口的 afterPropertiesSet() 方法 若配置了自定义的 init-method 方法,则执行该方法 BeanPostProcessor 后置处理
- 销毁(Destruction) 图中的第 8~10 步,第 8 步不是真正意义上的销毁(还没使用呢),而是先在使用前注册了销毁的相关调用接口,为了后面第 9、10 步真正销毁 bean 时再执行相应的方法 注册 Destruction 相关回调接口 (不是真正意义上的销毁) 是否实现 DisposableBean 接口 是否配置自定义的 destory-method
在上文中提到,初始化(Initialization)过程的扩展点包括(参考如下 initializeBean 函数)
- 检查 Aware 相关接口并设置依赖
- BeanPostProcessor 前置处理
- 若实现了 InitializingBean 接口,则调用该接口的 afterPropertiesSet() 方法
- 若配置了自定义的 init-method 方法,则执行该方法
- BeanPostProcessor 后置处理
public abstract class AbstractAutowireCapableBeanFactory extends AbstractBeanFactory implements AutowireCapableBeanFactory {

    ...

    protected Object initializeBean(String beanName, Object bean, @Nullable RootBeanDefinition mbd) {
        // 检查Aware相关接口并设置依赖
        if (System.getSecurityManager() != null) {
            AccessController.doPrivileged(() -> {
                this.invokeAwareMethods(beanName, bean);
                return null;
            }, this.getAccessControlContext());
        } else {
            this.invokeAwareMethods(beanName, bean);
        }
        // BeanPostProcessor前置处理
        Object wrappedBean = bean;
        if (mbd == null || !mbd.isSynthetic()) {
            wrappedBean = this.applyBeanPostProcessorsBeforeInitialization(bean, beanName);
        }

        try {
            // 若实现了InitializingBean接口,则调用该接口的AfterPropertiesSet()方法
            // 若配置了自定义的 init-method方法,则执行init-method方法
            this.invokeInitMethods(beanName, wrappedBean, mbd);
        } catch (Throwable var6) {
            throw new BeanCreationException(mbd != null ? mbd.getResourceDescription() : null, beanName, "Invocation of init method failed", var6);
        }

        if (mbd == null || !mbd.isSynthetic()) {
            // BeanPostProcessor后置处理
            wrappedBean = this.applyBeanPostProcessorsAfterInitialization(wrappedBean, beanName);
        }

        return wrappedBean;
    }

    ...
}
初始化过程细化后的 Bean 生命周期流程如下图所示。
销毁过程的扩展点和destroy方法
在上文中提到,销毁(Destruction)过程的扩展点包括(参考如下 destroy 函数)
- 注册 Destruction 相关回调接口 (不是真正意义上的销毁)
- 是否实现 DisposableBean 接口
- 是否配置自定义的 destory-method
Bean生命周期中方法执行的顺序
public abstract class AbstractAutowireCapableBeanFactory extends AbstractBeanFactory implements AutowireCapableBeanFactory { ... public void destroy() { // 9. 若实现 DisposableBean 接口,则执行 destory()方法 if (this.invokeDisposableBean) { if (logger.isTraceEnabled()) { logger.trace("Invoking destroy() on bean with name '" this.beanName "'"); } try { if (System.getSecurityManager() != null) { AccessController.doPrivileged(() -> { ((DisposableBean) this.bean).destroy(); return null; }, this.acc); } else { ((DisposableBean) this.bean).destroy(); } } } // 10. 若配置自定义的 detory-method 方法,则执行 if (this.destroyMethod != null) { this.invokeCustomDestroyMethod(this.destroyMethod); } else if (this.destroyMethodName != null) { Method methodToInvoke = this.determineDestroyMethod(this.destroyMethodName); if (methodToInvoke != null) { this.invokeCustomDestroyMethod(ClassUtils.getInterfaceMethodIfPossible(methodToInvoke)); } } } ... }在上文分析的基础上,编写一个示例代码,打印出 Bean 生命周期中各个方法的执行顺序。新建一个 UserBean 来实现 BeanNameAware,BeanFactoryAware,InitializingBean,DisposableBean,ApplicationContextAware 的接口,并在 XML 中配置 init-method 和 destory-method 方法。
- Bean
public class UserBean implements BeanNameAware, BeanFactoryAware,
        InitializingBean, DisposableBean, ApplicationContextAware {
    private String name;
    public String getName(){
        return name;
    }
    public void setName(String name){
        this.name = name;
        System.out.println("set方法被调用");
    }
    public void myInit(){
        System.out.println("myInit被调用");
    }
    public void myDestroy(){
        System.out.println("myDestroy被调用");
    }
    public UserBean(){
        System.out.println("UserBean构造方法");
    }
    @Override
    public void setBeanFactory(BeanFactory beanFactory) throws BeansException {
        System.out.println("BeanFactoryAware被调用");
    }

    @Override
    public void setBeanName(String s) {
        System.out.println("BeanNameAware被调用");
    }

    @Override
    public void destroy() throws Exception {
        System.out.println("DisposableBean被调用");
    }

    @Override
    public void afterPropertiesSet() throws Exception {
        System.out.println("InitializingBean被调用");
    }

    @Override
    public void setApplicationContext(ApplicationContext applicationContext) throws BeansException {
        System.out.println("setApplicationContext被调用");
    }
    public static void main(String []args){
        ApplicationContext ac = new ClassPathXmlApplicationContext("META-INF/beanlife.xml");
        //生命周期
        UserBean userBean = (UserBean)ac.getBean("user");
        ((ClassPathXmlApplicationContext) ac).close();
    }
}
- XML 配置
<?xml version="1.0" encoding="UTF-8" ?>
<beans xmlns="http://www.springframework.org/schema/beans"
       xmlns:xsi="http://www.w3.org/2001/XMLSchema-instance"
       xmlns:context="http://www.springframework.org/schema/context"
       xsi:schemaLocation="http://www.springframework.org/schema/beans
        http://www.springframework.org/schema/beans/spring-beans.xsd
        http://www.springframework.org/schema/context
        http://www.springframework.org/schema/context/spring-context.xsd">

    <!-- bean生命周期-->
    <bean id="user" class="test.model.UserBean"
          init-method="myInit" destroy-method="myDestroy">
        <property name="name" value="abc"></property>
    </bean>
    <bean id="postProcessor" class="test.model.CusBeanPostProcessor"/>
</beans>
- 打印出 Bean 生命周期中各个方法的执行顺序
再谈Bean的初始化
UserBean构造方法 set方法被调用 BeanNameAware被调用 BeanFactoryAware被调用 setApplicationContext被调用 postProcessBeforeInitialization被调用 InitializingBean被调用 myInit被调用 postProcessAfterInitialization被调用 DisposableBean被调用 myDestroy被调用在上文中提到,初始化(Initialization)过程的扩展点包括
Bean初始化时完成特定的初始化操作
- 检查 Aware 相关接口并设置依赖
- BeanPostProcessor 前置处理
- 若实现了 InitializingBean 接口,则调用该接口的 afterPropertiesSet() 方法
- 若配置了自定义的 init-method 方法,则执行该方法
- BeanPostProcessor 后置处理
在项目中经常会在容器启动时执行特定的初始化操作,如资源文件的加载等。常用的方式包括(也可使用 Aware 相关接口)
1.使用@PostConstruct注解
- 使用 @PostConstruct 注解
- 在配置文件中配置 init-method 方法
- 将类实现 InitializingBean 接口
Spring 的 @PostConstruct 注解在方法上,表示此方法是在 Spring 实例化该 Bean 之后马上执行此方法,之后才会去实例化其他 Bean,并且一个 Bean 中@PostConstruct 注解的方法可以有多个。
下面结合一个具体的例子进行说明。
- spring配置文件
<?xml version="1.0" encoding="UTF-8"?>
<beans xmlns="http://www.springframework.org/schema/beans" xmlns:xsi="http://www.w3.org/2001/XMLSchema-instance" xmlns:context="http://www.springframework.org/schema/context" xsi:schemaLocation="
http://www.springframework.org/schema/beans
http://www.springframework.org/schema/beans/spring-beans-3.0.xsd
http://www.springframework.org/schema/context
http://www.springframework.org/schema/context/spring-context-3.0.xsd
">

    <!-- 引入属性文件 -->
    <context:property-placeholder location="classpath:config.properties" />

    <!-- 自动扫描dao和service包(自动注入) -->
    <context:component-scan base-package="com.wbf.bean" />

</beans>
- Bean1
package com.wbf.bean;

import javax.annotation.PostConstruct;

import org.apache.log4j.Logger;
import org.springframework.stereotype.Service;

@Service("bean1")
public class Bean1 {

    private static final Logger log = Logger.getLogger(Bean1.class);

    public Bean1() {
        log.info(System.currentTimeMillis()   ": Bean1 Constructor");
    }

    @PostConstruct
    public void test() {
        log.info(System.currentTimeMillis()   ": bean1-->test()");
        Bean2.uniqueInstance().test();

    }

    @PostConstruct
    public void print() {
        log.info(System.currentTimeMillis()   ": bean1-->print()");
    }
}
- Bean2
package com.wbf.bean;

import org.apache.log4j.Logger;

public class Bean2 {

    private static final Logger log = Logger.getLogger(Bean2.class);

    private static Bean2 instance = uniqueInstance();

    public static Bean2 uniqueInstance() {
        if (instance == null)
            instance = new Bean2();

        return instance;
    }

    public Bean2() {
        log.info(System.currentTimeMillis()   ": Bean2 Construtor");
    }

    public void test() {
        log.info(System.currentTimeMillis()   ": bean2-->test()");
    }
}
- Bean3
package com.wbf.bean;

import org.apache.log4j.Logger;
import org.springframework.stereotype.Service;

@Service("bean3")
public class Bean3 {

    private static final Logger log = Logger.getLogger(Bean3.class);

    public Bean3() {
        log.info(System.currentTimeMillis()   ": Bean3 Construtor");
    }

}
- SpringTest 测试方法
package com.wbf.bean;

import org.junit.Test;
import org.springframework.context.ApplicationContext;
import org.springframework.context.support.ClassPathXmlApplicationContext;

public class SpringTest {

    @Test
    public void test() {
        //加载/解析spring.xml, 得到BeanFactory, 实例化所有IOC容器中的Bean
        //在实例化每一个Bean之后,如果当前Bean包含@PostConstruct注解的方法则会马上执行该方法,之后才会去实例化其他的Bean
        //每一个Bean中可以有多个包含@PostConstruct注解的方法
        ApplicationContext ac = new ClassPathXmlApplicationContext(new String[]{"classpath:spring.xml"});
    }
}
- 程序运行结果
[com.wbf.bean.Bean1]1433994678340: Bean1 Constructor
[com.wbf.bean.Bean1]1433994678347: bean1-->print()
[com.wbf.bean.Bean1]1433994678347: bean1-->test()
[com.wbf.bean.Bean2]1433994678348: Bean2 Construtor
[com.wbf.bean.Bean3]1433994678348: Bean3 Construtor
从运行结果可以看出,Spring 在实例化 Bean1 之后(执行 Bean1 的构造函数 Constructor 之后),马上执行了它的 @PostConstruct 注解的方法 print() 和 test(),之后才去实例化 Bean3。其中 Bean2 没有被 Spring IOC 容器管理。
@PostConstruct
    --------------------
1   |  服务器加载Servlet |
    --------------------
            |
    --------------------
2   |  Servlet构造函数   |
    --------------------
            |
    --------------------
3   |   PostConstruct   |
    --------------------
            |
    --------------------
4   |      Init         |
    --------------------
            |
    --------------------
5   |     Service      |
    --------------------
            |
    --------------------
6   |    destroy       |
    --------------------
            |
    --------------------
7   |    PreDestroy    |
    --------------------
            |
    ----------------------
8   | 服务器卸载Servlet完毕 |
    ----------------------
- @PostConstruct
被 @PostConstruct 修饰的方法会在服务器加载 Servlet(bean) 的时候运行,并且只会被服务器调用一次,类似于 Serclet 的 inti() 方法。被@PostConstruct 修饰的方法会在构造函数之后,init() 方法之前运行。
- @PreDestroy
被 @PreDestroy 修饰的方法会在服务器卸载 Servlet(bean) 的时候运行,并且只会被服务器调用一次,类似于 Servlet 的 destroy() 方法。被@PreDestroy 修饰的方法会在 destroy() 方法之后,在 Servlet 被彻底卸载之前执行。
Constructor、@Autowired和@PostConstruct的顺序从依赖注入的字面意思就可以知道,要将对象 p 注入到对象 a,那么首先就必须得生成对象 a 和对象 p,才能执行注入。所以,如果一个类 A 中有个成员变量 p 被@Autowried 注解,那么 @Autowired 注入是发生在 A 的构造方法执行完之后的。
如果想在生成对象时完成某些初始化操作,而偏偏这些初始化操作又依赖于依赖注入,那么就无法在构造函数中实现。为此,可以使用 @PostConstruct 注解一个方法来完成初始化,@PostConstruct 注解的方法将会在依赖注入完成后被自动调用。
即执行顺序为
Constructor -> @Autowired -> @PostConstruct结合如下代码,对三个方法的执行顺序加深理解。
2.将类实现InitializingBean接口
public Class AAA{ @Autowired private BBB b; public AAA() { System.out.println("此时b还未被注入: b = " b); } @PostConstruct private void init () { System.out.println("@PostConstruct将在依赖注入完成后被自动调用: b = " b); } }接口 InitializingBean 的源码如下,包含一个方法 afterPropertiesSet()。
3.在配置文件中配置init-method方法
package org.springframework.beans.factory; /** * Interface to be implemented by beans that need to react once all their properties * have been set by a {@link BeanFactory}: e.g. to perform custom initialization, * or merely to check that all mandatory properties have been set. * * <p>An alternative to implementing {@code InitializingBean} is specifying a custom * init method, for example in an XML bean definition. For a list of all bean * lifecycle methods, see the {@link BeanFactory BeanFactory javadocs}. * * @author Rod Johnson * @author Juergen Hoeller * @see DisposableBean * @see org.springframework.beans.factory.config.BeanDefinition#getPropertyValues() * @see org.springframework.beans.factory.support.AbstractBeanDefinition#getInitMethodName() */ public interface InitializingBean { /** * Invoked by the containing {@code BeanFactory} after it has set all bean properties * and satisfied {@link BeanFactoryAware}, {@code ApplicationContextAware} etc. * <p>This method allows the bean instance to perform validation of its overall * configuration and final initialization when all bean properties have been set. * @throws Exception in the event of misconfiguration (such as failure to set an * essential property) or if initialization fails for any other reason */ void afterPropertiesSet() throws Exception; }上述3种方式的执行顺序
<bean id="student" class="com.demo.spring.entity.Student" init-method="init2"> <property name="name" value="景甜"></property> <property name="age" value="28"></property> <property name="school" ref="school"></property> </bean>上文介绍了初始化 bean 时执行特定的初始化操作的 3 种方法。那么如果 3 种方式同时使用,它们的执行顺序是什么呢? 来看下面一个例子。
package com.demo.spring.entity;

import javax.annotation.PostConstruct;

import org.springframework.beans.factory.InitializingBean;
import org.springframework.stereotype.Component;


@Component("student")
public class Student implements InitializingBean{
    private String name;
    private int age;

    private School school;

    public String getName() {
        return name;
    }
    public void setName(String name) {
        this.name = name;
    }
    public int getAge() {
        return age;
    }
    public void setAge(int age) {
        this.age = age;
    }
    public School getSchool() {
        return school;
    }
    public void setSchool(School school) {
        this.school = school;
    }

    //1.使用postconstrtct注解
    @PostConstruct
    public void init(){
        System.out.println("执行 init方法");
    }

    //2.在xml配置文件中配置init-method方法
    public void init2(){
        System.out.println("执行init2方法 ");
    }

    //3.实现InitializingBean接口
    public void afterPropertiesSet() throws Exception {
        System.out.println("执行init3方法");
    }

}
执行结果如下
执行 init方法

2018-06-11 10:09:16: Invoking afterPropertiesSet() on bean with name 'student'

执行init3方法

2018-06-11 10:09: Invoking init method 'init2' on bean with name 'student'

执行init2 方法
可以看到,先执行 @PostConstruct 注解的方法,然后执行实现 InitializingBean 接口的 afterPropertiesSet 方法,最后执行在配置文件中配置的init-method 方法。即执行顺序为
@PostConstruct -> InitializingBean-afterPropertiesSet -> xml配置文件中的init-method方法至于为什么是这个顺序,可以看源码。
- AbstractAutowireCapableBeanFactory 类代码如下
protected Object initializeBean(final String beanName, final Object bean, RootBeanDefinition mbd) {
        if (System.getSecurityManager() != null) {
            AccessController.doPrivileged(new PrivilegedAction<Object>() {
                @Override
                public Object run() {
                    invokeAwareMethods(beanName, bean);
                    return null;
                }
            }, getAccessControlContext());
        }
        else {
            invokeAwareMethods(beanName, bean);
        }

        Object wrappedBean = bean;
        if (mbd == null || !mbd.isSynthetic()) {
            wrappedBean = applyBeanPostProcessorsBeforeInitialization(wrappedBean, beanName);
        }

        try {       //调用初始化方法
            invokeInitMethods(beanName, wrappedBean, mbd);
        }
        catch (Throwable ex) {
            throw new BeanCreationException(
                    (mbd != null ? mbd.getResourceDescription() : null),
                    beanName, "Invocation of init method failed", ex);
        }
        if (mbd == null || !mbd.isSynthetic()) {
            wrappedBean = applyBeanPostProcessorsAfterInitialization(wrappedBean, beanName);
        }
        return wrappedBean;
    }
- 然后进入到 invokeInitMethods 方法中
protected void invokeInitMethods(String beanName, final Object bean, RootBeanDefinition mbd) throws Throwable {
    //判断该bean是否实现了实现了InitializingBean接口,如果实现了InitializingBean接口,则只调用bean的afterPropertiesSet方法
    boolean isInitializingBean = (bean instanceof InitializingBean);
    if (isInitializingBean && (mbd == null || !mbd.isExternallyManagedInitMethod("afterPropertiesSet"))) {
        if (logger.isDebugEnabled()) {
            logger.debug("Invoking afterPropertiesSet() on bean with name '"   beanName   "'");
        }

        if (System.getSecurityManager() != null) {
            try {
                AccessController.doPrivileged(new PrivilegedExceptionAction<Object>() {
                    public Object run() throws Exception {
                        //直接调用afterPropertiesSet
                        ((InitializingBean) bean).afterPropertiesSet();
                        return null;
                    }
                },getAccessControlContext());
            } catch (PrivilegedActionException pae) {
                throw pae.getException();
            }
        }
        else {
            //直接调用afterPropertiesSet
            ((InitializingBean) bean).afterPropertiesSet();
        }
    }
    if (mbd != null) {
        String initMethodName = mbd.getInitMethodName();
        //判断是否指定了init-method方法,如果指定了init-method方法,则再调用制定的init-method
        if (initMethodName != null && !(isInitializingBean && "afterPropertiesSet".equals(initMethodName)) &&
                !mbd.isExternallyManagedInitMethod(initMethodName)) {
            //进一步查看该方法的源码,可以发现init-method方法中指定的方法是通过反射实现
            invokeCustomInitMethod(beanName, bean, mbd);
        }
    }
}
从上述源码可以看到,实现 InitializingBean 接口是直接调用 afterPropertiesSet 方法,比通过反射调用 init-method 指定的方法效率相对来说要高点。但是 init-method 方式消除了对 Spring 的依赖。
实战应用在上一章节「初始化bean时执行特定的初始化操作」中介绍了通过实现 InitializingBean 接口来执行特定的初始化操作。在实际业务开发中,可以通过该接口,执行监控埋点、降级配置等操作。
来看一个示例。
//素材中心JSF-国际站
package com.jd.materialjsf.i18n.service.delivery.handler;

@Getter
@Slf4j
public abstract class BaseBiHandler implements EventHandler<DeliveryEvent>, InitializingBean {
    /**
     * 投放类型
     */
    String deliveryType;
    /**
     * 降级开关
     */
    DuccManagerKeys switchKey;
    /**
     * 监控key
     */
    String umpKey;
    /**
     * 算法标识
     */
    AlgoEnum algoEnum;
    /**
     * 分页大小
     */
    int pageSize;

    @Autowired
    private EventProcessThreadPool getDeliveryResultThreadPool;

    @Autowired
    private DuccManager duccManager;

    @Override
    public void onEvent(DeliveryEvent deliveryEvent) {
        //降级
        if (duccManager.getAvailConfigBool(switchKey, false)) {
            return;
        }

        //request
        if(pageSize<0 || sortDidList.size()<=pageSize){ //不需要分页
            CallerInfo callerInfo = Ump.methodReg(umpKey);
            try {
                handle(deliveryEvent);
            }catch (DeliveryException e){
                log.error("handler error. deliveryType:{}, message:{}", e.getDeliveryType(), e.getMessage());
                Ump.funcError(callerInfo);
            }catch (Exception e){
                log.error("handler error", e);
                Ump.funcError(callerInfo);
            }finally {
                Ump.methodRegEnd(callerInfo);
            }
            return;
        }

        //handleData
       this.handleData(deliveryEvents, deliveryType, originSortedResult);
    }

    public SortedResult handleData(List<DeliveryEvent> deliveryEvents, String deliveryType, SortedResult result) {
        // ...
    }


    //实现了InitializingBean接口
    //在afterPropertiesSet此处执行对应的初始化操作
    //1. 初始化算法标识
    //2. 初始化投放类型
    //3. 初始化降级开关
    //4. 初始化UMP监控
    //5. 初始化分页大小
    @Override
    public void afterPropertiesSet() throws Exception {
        initAlgoEnum();
        initDeliveryType();
        initSwitchKey();
        initUmpKey();
        initPageSize();
    }

    void handle(DeliveryEvent deliveryEvent){
        if(!preHandle(deliveryEvent)){
           return;
        }
        //实际的数据处理 ...
    }

    /**
     * 请求算法之前的操作
     * @param deliveryEvent
     * @return
     */
    boolean preHandle(DeliveryEvent deliveryEvent){
        return true;
    }

    abstract SortedResult requestBi(DeliveryEvent deliveryEvent);

    /**
     * 初始化降级开关
     */
    abstract void initSwitchKey();

    /**
     * 初始化监控key
     */
    abstract void initUmpKey();

    /**
     * 初始化投放类型
     */
    abstract void initDeliveryType();

    /**
     * 初始化算法标识
     */
    void initAlgoEnum(){
        algoEnum = AlgoEnum.RECOMMEND;
    }

    /**
     * 初始化分页大小 -1表示不需要分页
     */
    void initPageSize(){
        pageSize = -1;
    }

}
作者:变速风声链接:https://juejin.cn/post/7099649788500508685来源:稀土掘金
,