1.打开eclipse后,新建一个web项目:
new -- dynamic web project
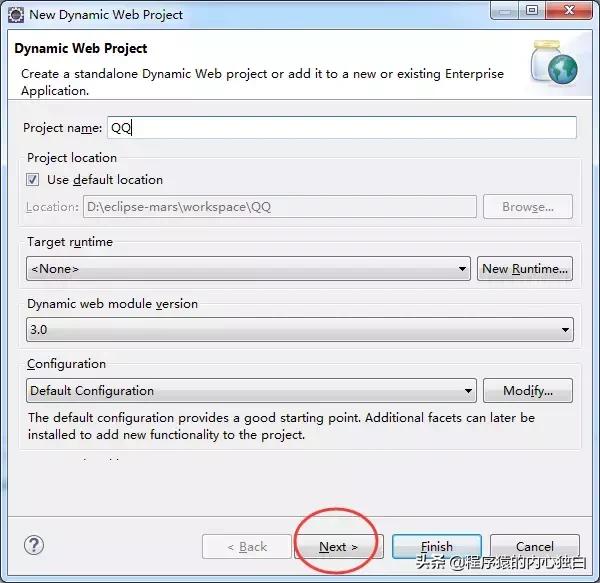

点击Finish,新建项目完成!

调整字体大小:
window -- preferences

选择basic,


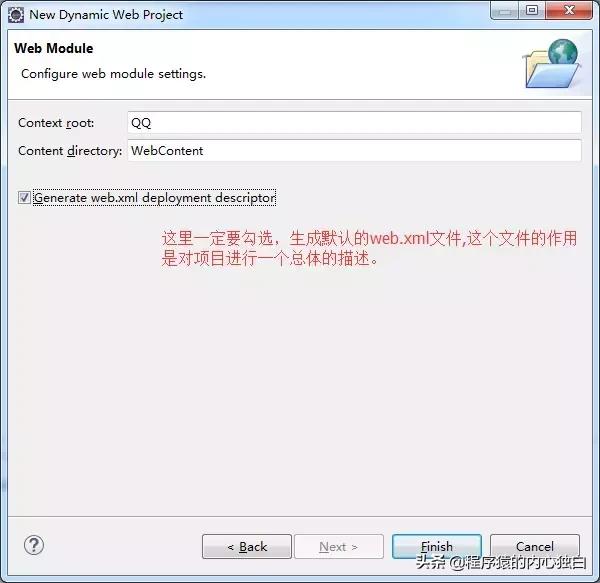
web.xml
<?xml version="1.0" encoding="UTF-8"?> <web-app xmlns:xsi="http://www.w3.org/2001/XMLSchema-instance" xmlns="http://java.sun.com/xml/ns/javaee" xsi:schemaLocation="http://java.sun.com/xml/ns/javaee http://java.sun.com/xml/ns/javaee/web-app_3_0.xsd" id="WebApp_ID" version="3.0"> <display-name>QQ</display-name> <welcome-file-list> <welcome-file>index.html</welcome-file> <welcome-file>index.htm</welcome-file> <welcome-file>index.jsp</welcome-file> <welcome-file>default.html</welcome-file> <welcome-file>default.htm</welcome-file> <welcome-file>default.jsp</welcome-file> </welcome-file-list> </web-app>
welcome-file-list表示项目的欢迎页。
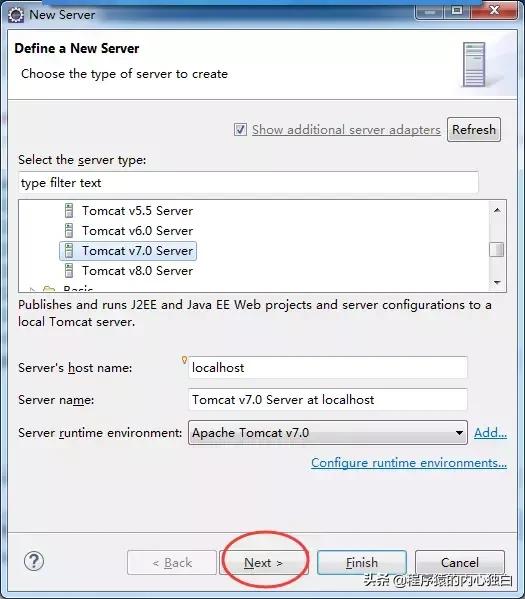
2. 引入Tomcat服务器
在eclipse下方,有一个servers视图

如果没有,就去window选项卡中,点击 show view
如果还是没有servers,就点击other:

添加一个服务器:


找到Tomcat7.0版本:
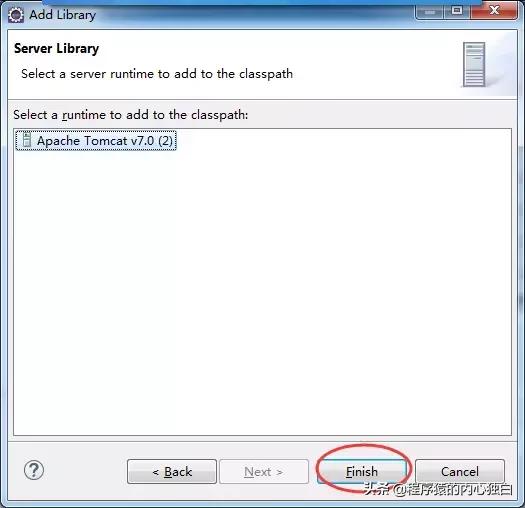
如果是第一次添加Tomcat,则需要去引入一下:

选择你想要发布的web项目:

3. 在WebContent目录新建一个欢迎页 index.jsp
右键 WebContent , new , JSP File


<%@ page language="java" contentType="text/html; charset=ISO-8859-1" pageEncoding="ISO-8859-1"%> <!DOCTYPE html PUBLIC "-//W3C//DTD HTML 4.01 Transitional//EN" "http://www.w3.org/TR/html4/loose.dtd"> <html> <head> <meta http-equiv="Content-Type" content="text/html; charset=ISO-8859-1"> <title>Insert title here</title> </head> <body> </body> </html>
可以看到JSP页面默认的编码格式为ISO-8859-1,这种编码不支持中文!所以,我们需要把它改为UTF-8
<%@ page language="java" contentType="text/html; charset=UTF-8" pageEncoding="UTF-8"%> <!DOCTYPE html PUBLIC "-//W3C//DTD HTML 4.01 Transitional//EN" "http://www.w3.org/TR/html4/loose.dtd"> <html> <head> <meta http-equiv="Content-Type" content="text/html; charset=UTF-8"> <title>Insert title here</title> </head> <body> </body> </html>
发现有一个报错信息:

因为还缺少web开发所需要的包,右键项目,Build Path -- Configure Build Path


现在,我们给index.jsp写上一句话:
<%@ page language="java" contentType="text/html; charset=UTF-8" pageEncoding="UTF-8"%> <!DOCTYPE html PUBLIC "-//W3C//DTD HTML 4.01 Transitional//EN" "http://www.w3.org/TR/html4/loose.dtd"> <html> <head> <meta http-equiv="Content-Type" content="text/html; charset=UTF-8"> <title>Insert title here</title> </head> <body> <h1>Hello web!</h1> </body> </html>
4. 启动项目


运行成功!
然后,查看该Tomcat的端口号:


发现端口号为8080。
4. 访问欢迎页面
打开浏览器,在地址栏输入:http://localhost:8080/QQ/