编译安装nginx搭建小游戏网站
编译安装流程

下载nginx代码
wget -P /server/tools/ http:Վˌnginx.org/download/nginx1.22.0.tar.gz
解压并进入目录
cd /server/tools/ tar xf nginx-1.22.0.tar.gz cd nginx-1.22.0/
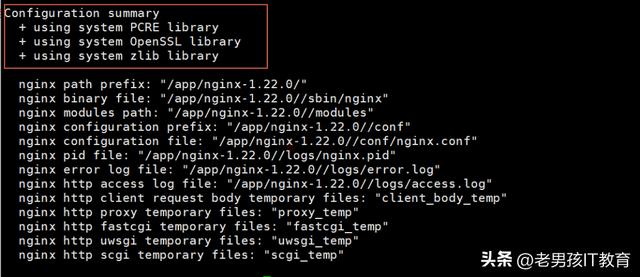
配置
./configure prefix=/app/nginx-1.22.0/ user=nginx
group=nginx with-http_ssl_module with-http_v2_module
with-http_stub_status_module
# prefix指定安装目录
user 用户
group 用户组
成功提示:
错误提示:
./configure: error: the HTTP rewrite module requires the PCRE library.

You can either disable the module by using Վʔwithouthttp_rewrite_module option, or install the PCRE library into the system, or build the PCRE library statically from the source with nginx by using Վʔwith-

pcre=<path> option.

yum install -y pcre-devel
./configure: error: SSL modules require the OpenSSL library.

You can either do not enable the modules, or install the OpenSSL library into the system, or build the OpenSSL library statically from the source with nginx by using Վʔwith-openssl=<path> option.

yum install -y openssl-devel
编译make成功提示:

安装:
make install
后续配置
检查目录
ll /app/nginx-1.22.0/
总用量 0
drwxr-xr-x 2 root root 333 7月
drwxr-xr-x 2 root root 40 7月
drwxr-xr-x 2 root root 6 7月
drwxr-xr-x 2 root root 19 7月
创建用户
useradd -s /sbin/nologin -M nginx
创建软链接
ln -s /app/nginx-1.22.0/   /app/nginx
并检查
管理编译安装的nginx
温馨提示:关闭防火墙和selinux
#1. 查看nginx版本信息及编译信息
/app/nginx/sbin/nginx -V nginx version: nginx/1.22.0 built by gcc 4.8.5 20150623 (Red Hat 4.8.5-44) (GCC) built with OpenSSL 1.0.2k-fips 26 Jan 2017 TLS SNI support enabled configure arguments: Վʔprefix=/app/nginx-1.22.0/ Վʔ user=nginx Վʔgroup=nginx Վʔwith-http_ssl_module Վʔwithhttp_v2_module Վʔwith-http_stub_status_module

#2.启动nginx
/app/nginx/sbin/nginx ps aux |grep nginx

#3. 关闭
pkill nginx
nginx: [emerg] bind() to 0.0.0.0:80 failed (98: Address already in use)
nginx: [emerg] bind() to 0.0.0.0:80 failed (98: Address already in use)
nginx: [emerg] bind() to 0.0.0.0:80 failed (98: Address already in use)
nginx: [emerg] bind() to 0.0.0.0:80 failed (98: Address already in use)
nginx已经运行了并占用80端口
检查端口nginx

ss -lntup |grep nginx
访问网站
启动nginx并检查:浏览器中输入服务器ip地址即可

配置代码
代码目录/app/nginx/html/下面 默认显示index.html内容
代码目录/app/nginx/html/下面 默认显示index.html内容

配置小鸟飞飞代码
#1. 解压
unzip bird.zip
#2. 移动
\mv bird/* /app/nginx/html/

#3. 检查
ll /app/nginx/html/

总用量 144

-rw-r--r-- 1 root root 15329 8月  2 2014 2000.png

-rw-r--r-- 1 root root 51562 8月  2 2014 21.js

-rw-r--r-- 1 root root 497 7月  29 12:10 50x.html

-rw-r--r-- 1 root root 254 8月  2 2014 icon.png

drwxr-xr-x 2 root root 102 8月  8 2014 img

-rw-r--r-- 1 root root 3049 8月  2 2014 index.html

-rw-r--r-- 1 root root 63008 8月  2 2014 sound1.mp3
检查最终结果

二进制方式安装tomcat
部署tomcat
安装jdk
yum install -y java #openjdk
下载
wget -P /server/tools/
https://dlcdn.apache.org/tomcat/tomcat9/v9.0.65/bin/apache-tomcat-9.0.65.tar.gz

https://mirrors.aliyun.com/apache/
下载地址:
https://mirrors.aliyun.com/apache/tomcat/tomcat9/v9.0.65/bin/?spm=a2c6h.25603864.0.0.1bca5120a32WtZ

wget -P /server/tools/ https://mirrors.aliyun.com/apache/tomcat/tomcat9/v9.0.65/bin/apache-tomcat-9.0.65.tar.gz
解压
tar xf apache-tomcat-9.0.65.tar.gz -C /app/
软连接
ln -s /app/apache-tomcat-9.0.65/ /app/tomcat
启动与访问
启动
/app/tomcat/bin/startup.sh

/app/tomcat/bin/shutdown.sh
检查端口与进程
ps -ef |grep java

ss -lntup |grep java

浏览器访问: http://10.0.0.200:8080

搭建企业内部yum仓库
yum仓库架构详解
自己搭建内部yum仓库


yum仓库服务端
创建目录
/app/yumlocal
解压软件包到/app/yumlocal目录下
php72w-new.tar.gz
通过creatrepo在这个目录中生成rpm包列表(属性信息文件)
yum install -y createrepo
createrepo /app/yumlocal/
目录下面就多了个repodata目录.
安装与配置nginx
#关闭已有的
nginx pkill nginx ps -ef |grep nginx

#安装
yum install -y nginx

#启动
systemctl enable nginx systemctl start nginx

#检查端口与进程

#浏览器访问
配置nginx
[root@oldboy83-prod tools]# cat
/etc/nginx/conf.d/yumlocal.conf
server {
listen 12306;
root /app/yumlocal;
autoindex on;
index index.html;
}
systemctl restart nginx

ss -lntup |grep nginx
tcp LISTEN 0 128 *:12306
*:* users:(("nginx",pid=10460,fd=6),
("nginx",pid=10458,fd=6))
tcp LISTEN 0 128 *:80
*:* users:(("nginx",pid=10460,fd=7),
("nginx",pid=10458,fd=7))
tcp LISTEN 0 128 [ ]:80
[ ]:* users:(("nginx",pid=10460,fd=8),
("nginx",pid=10458,fd=8))
浏览器访问测试 http: 10.0.0.200:12306

yum客户端配置
注释已经配置的yum源文件
cd /etc/yum.repos.d/
gzip *
书写新的yum配置即可
cat yumlocal-10.0.0.200.repo
[yumlocal]
name = 'yum local 内部yum源 10.0.0.200'
baseurl = http:Վˌ10.0.0.200:12306
enalbed = 1
gpgcheck = 0
测试是否可以使用内部yum仓库
#1.清空缓存
yum clean all
Loaded plugins: fastestmirror
Cleaning repos: yumlocal

Cleaning up list of fastest mirrors
Other repos take up 183 M of disk space (use verbose for
details)

#2.根据新的配置生成缓存
yum makecache
Loaded plugins: fastestmirror
Determining fastest mirrors
yumlocal
| 2.9 kB 00:00:00
(1/3): yumlocal/filelists_db
| 13 kB 00:00:00
(2/3): yumlocal/other_db
| 5.3 kB 00:00:00
(3/3): yumlocal/primary_db
| 22 kB 00:00:00
Metadata Cache Created

#3. 查看yum源列表
yum repolist
Loaded plugins: fastestmirror
Loading mirror speeds from cached hostfile
repo id repo name
status
yumlocal 'yum local 内部
yum源 10.0.0.200' 20
repolist: 20
遇到下载失败或依赖问题
服务端:需要在服务端下载依赖,上传到目录中
#1. 开启keepcache功能
grep keepcache /etc/yum.conf
#2. 进入软件包目录
cd /app/yumlocal/
#3. 本地安装并下载依赖
yum localinstall -y *.rpm
#4. 找出缓存的rpm包
find /var/cache/yum/ -type f -name "*.rpm"
#4.找出缓存的rpm包并复制到/app/yumlocal/目录
find /var/cache/yum/ -type f -name "*.rpm" |xargs cp -t
/app/yumlocal/
ll /app/yumlocal/*.rpm |wc -l
服务端:重新createrepo
#5. 重新生成
createrepo /app/yumlocal/
服务端:yum clean all 然后 yum makecache 然后 yum install
yum clean all
yum makecache
yum repolist
yum install -y php72w-cli
企业级SRE运维必会项目
【学习资料 视频教程合集】
免费领取,限 200 名
评论区告诉我!!!
,