本文系结合sketch的帮助文档,在翻译的基础上,结合实际案例讲解。
主要是写给想学习sketch的产品经理,或前端开发人员。
正文:
选中图层后,就可以随意拖动了。如果要限制图层拖动的方向,可以在拖动时同时按住“Shift”键,在拖动时就会锁定一个方向,不能想怎么拖就怎么拖了。
(You can move a selected layer by grabbing and moving it around with the pointer. To restrict movement to a particular axis, hold down the Shift key as you drag.)
当您在拖动或调整图层大小时,Sketch默认会将您拖动或调整的图层与邻近的图层对齐。如果在实际操作中不是这样的,肯定是您又把“智能指引”功能给关闭了。开启这个功能的方法是:在工具栏上选择视图(view)> 画布(Canvas)>显示智能指引(Show Smart Guides)。
(As you move (or resize) your layer, Sketch should automatically align your layers to adjacent layers. If this doesn’t happen, you might have accidentally hidden smart guides. To enable them, choose View › Canvas › Show Smart Guides in the menu.)
如果您是按住“Option”键并拖动,这样是复制一个图层,并拖着这个复制的图层离开原来的位置。如果您按住“Command-D”键并同时拖动鼠标,Sketch则会无限复制当前图层。
(If you hold down the Option key while dragging, you will clone the layer, leaving the original layer in its place. If you then immediately press Command-D (duplicate), Sketch will insert another duplicated layer at exactly the same offset as your first duplicate.)
您也可以将当前页面的图层拖动到页面面板上面,然后选择另一个页面拖进去。
对齐图层(Aligning Layers)您可以使用对齐工具快速的移动选中的多个图层,对齐工具在右侧监视器面板的最上方:
(In addition to quickly moving selected layers, you can align and distribute them evenly by using the following buttons in the top-right corner of the Inspector:)
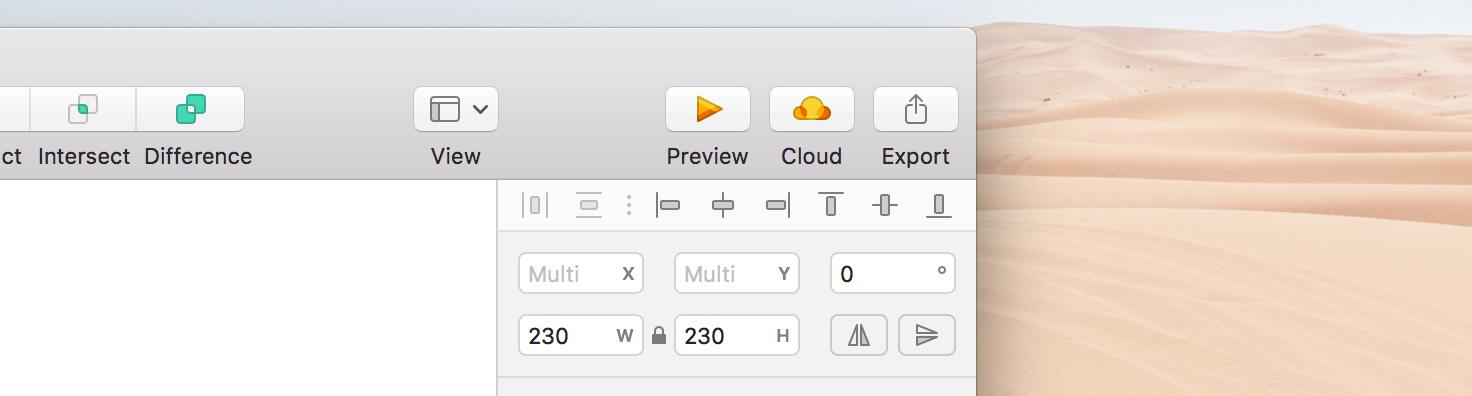
对齐工具最左边的两个是水平对齐和垂直对齐。您也可以在菜单栏里找到对这两个对齐方式,或者使用快捷键:“Conrol键 Command键 V键”代表垂直对齐,“Conrol键 Command键 H键”代表水平对齐。如果您想移动图层时,保证每个图层的间距相对,可以打开网格工具(注:移动时会自动对齐网格,每个网格间的距离相等)。您可以可以在账户设置里将网格的间距调整为像素显示模式,这会让对齐时的尺寸更加精确。
(The first two are for distributing layers horizontally and vertically . You can also choose Arrange › Distribute Objects or use these shortcuts; Control-Command-V or Control-Command-H. If you want to distribute the layers with fixed spacing then you can use the Make Grid tool. These options also take the pixel fitting preference into account to help you to be as precise as possible.)
剩余的六个按钮分别是:左对齐,水平距中对齐,右对齐,顶对齐,垂直距主对齐,底对齐。不仅可以用来调整图层的对齐,还可以做用来调整画板的对齐。
(The next six buttons (align left , horizontally , right , top , vertically , and bottom ) are for aligning layers among themselves or to the Artboard.)
当多个图层选中,Touch Bar就会很智能地显示对齐工具供您选择了。
When multiple layers are selected, the MacBook Pro’s Touch Bar will display the above distribute and align controls right on the keyboard for easy access.

如果是要把一个图层依据画布进行对齐(注:在Touch Bar上操作),按下“Option键”并选择您想要的对齐按钮就可以了,多个图层的对齐操作也是如此。在Touch Bar上我们还会看到群组按钮,当多个图层被选中时,点击“群组”按钮就会生成一个群组对象了。
(To align a layer to the Artboard, hold down the Option key and choose the align button you desire. You can also do this with multiple layers simultaneously. Another approach is to first group the objects by using the Group item in the toolbar.)
如果您要将图层向某个特定对象对齐,首先要将这个对象(注:也是一个图层)锁定(具体的操作方法:在图层列表区里选中要锁定的图层,然后可以按Option键的同时鼠标移至右侧,或直接右键弹出菜单,在弹出菜单里选择锁定,或直接使用快捷键“Shift-Command-L”,然后在图层列表里选中要对齐的多个图层(包含这个特定对象),所有图层会以该对象进行对齐操作。如果选中的多个图层里没有刚才锁定的图层,Sketch将以这里的做生意两个距离最远的图层为对齐标准进行对齐计算。
(To align layers to a specific object, first lock that layer by using the lock button in the Layer List or by using Shift-Command-L. If no specific object is selected, Sketch will align the layers to the outermost layer of all those selected.)
PS:我需要把英文原文也贴上来吗?还是只用中文就可以了?
如果对翻译的内容或实际的案例有疑问的,欢迎留言!
作于:2018年11月16日。
上一篇:SKETCH基础教程第10课:图层基础-选择图层
,


