查看日期时间
wms@testwmsapp:~$ date
Mon Jan 16 16:43:42 CST 2023

检查时区命令:
wms@testwmsapp:~$ cat /etc/timezone
Asia/Shanghai

修改时区为亚洲上海
sudo timedatectl set-timezone Asia/Shanghai

同步内网时间服务器命令(前提是安装了NTPdate):
wms@testwmsapp:~$ ntpdate 10.221.237.10

Command 'ntpdate' not found, but can be installed with:
sudo apt install ntpdate         # version 1:4.2.8p15 dfsg-1ubuntu2, or
sudo apt install ntpsec-ntpdate  # version 1.2.1 dfsg1-4
执行安装ntpdate就可以了。
查看时钟是否与互联网同步,运行timedatectl命令
wms@wmsredis02:~$ timedatectl
               Local time: Mon 2023-01-16 16:41:52 CST
           Universal time: Mon 2023-01-16 08:41:52 UTC
                 RTC time: Mon 2023-01-16 08:42:18
                Time zone: Asia/Shanghai (CST,  0800)
System clock synchronized: no
              NTP service: active
          RTC in local TZ: no
Local time即是当前服务器的时间,也就是执行date命令返回的时间值。Universal time是标准时间。RTC time是服务器的硬件时钟芯片上的时间。
SYSTEM clock synchronized标志就是服务器时间是否同步的标志 ,如果其值为yes则为自动同步,如果为No则需要修改配置。
#开启自动同步
root@ziZ:~# timedatectl set-ntp on
#重启systemd-timesyncd服务
root@ziZ:~# systemctl restart systemd-timesyncd.service
修改时间为24小时,在/etc/default/locale,默认没有LC_TIME这个变量,在文件中增加一行:

:wq保存退出,然后reboot重启服务器即可生效,date命令查看是24小时时间格式。
阿里云Ubuntu 22.04 国内镜像源
修改镜像源
sudo vi /etc/apt/sources.list
deb http://mirrors.aliyun.com/ubuntu/ jammy main restricted universe multiverse
deb-src http://mirrors.aliyun.com/ubuntu/ jammy main restricted universe multiverse
deb http://mirrors.aliyun.com/ubuntu/ jammy-security main restricted universe multiverse
deb-src http://mirrors.aliyun.com/ubuntu/ jammy-security main restricted universe multiverse
deb http://mirrors.aliyun.com/ubuntu/ jammy-updates main restricted universe multiverse
deb-src http://mirrors.aliyun.com/ubuntu/ jammy-updates main restricted universe multiverse
deb http://mirrors.aliyun.com/ubuntu/ jammy-proposed main restricted universe multiverse
deb-src http://mirrors.aliyun.com/ubuntu/ jammy-proposed main restricted universe multiverse
deb http://mirrors.aliyun.com/ubuntu/ jammy-backports main restricted universe multiverse
deb-src http://mirrors.aliyun.com/ubuntu/ jammy-backports main restricted universe multiverse
更换镜像源&&更新源更新软件
sudo apt-get update && sudo apt-get upgrade
cd /etc/netplan/
修改DNS
sudo vi 00-installer-config.yaml
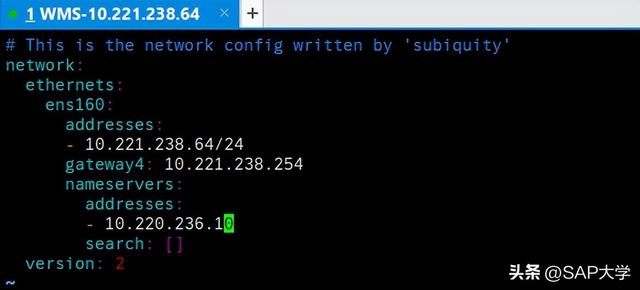
重启网络服务sudo netplan apply
查看DNS状态 sudo systemctl status systemd-networkd


