MVVM,一个软件架构设计模式,由微软WPF和Silverlight的架构师Ken Cooper和Ted Peters开发,是一种简化用户界面的事件驱动编程方式。
客户端架构有三种:MVC: Model-View-Controller、MVP: Model-View-Presenter和MVVM: Model-View-ViewModel。
MVVM的本质上是MVC的改进版,就是将其中的View的状态和行为抽象化,将视图UI和业务逻辑分开。

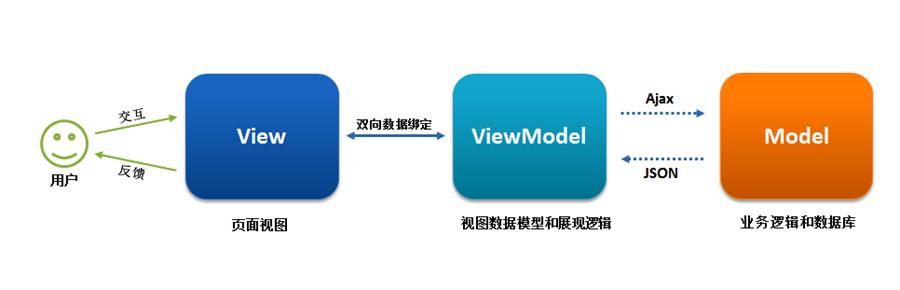
下图:

代码:
<div id="app">
    <p>{{message}}</p>
    <h1>{{message   '在outer HTML中了'}}</h1>
</div>
<script src="vue.js"></script>
<script type="text/javascript">
    var app = new Vue({
        el: '#app',
        data: {
            message: "小奋斗的悲哀,知与谁说!"
        },
        template: "<h1>{{message  '在template中了'}}</h1>",
        // render: function(createElement) {
        //     return createElement('h1', 'this is createElement')
        // },
        beforeCreate: function () {
            console.group('beforeCreate 创建前状态===============》');
            console.log("%c%s", "color:red", "el     : "   this.$el); //undefined
            console.log("%c%s", "color:red", "data   : "   this.$data); //undefined
            console.log("%c%s", "color:red", "message: "   this.message)
        },
        created: function () {
            console.group('created 创建完毕状态===============》');
            console.log("%c%s", "color:red", "el     : "   this.$el); //undefined
            console.log("%c%s", "color:red", "data   : "   this.$data); //已被初始化
            console.log("%c%s", "color:red", "message: "   this.message); //已被初始化
        },
        beforeMount: function () {
            console.group('beforeMount 挂载前状态===============》');
            console.log("%c%s", "color:red", "el     : "   (this.$el)); //已被初始化
            console.log(this.$el);
            console.log("%c%s", "color:red", "data   : "   this.$data); //已被初始化
            console.log("%c%s", "color:red", "message: "   this.message); //已被初始化
        },
        mounted: function () {
            console.group('mounted 挂载结束状态===============》');
            console.log("%c%s", "color:red", "el     : "   this.$el); //已被初始化
            console.log(this.$el);
            console.log("%c%s", "color:red", "data   : "   this.$data); //已被初始化
            console.log("%c%s", "color:red", "message: "   this.message); //已被初始化
        },
        beforeUpdate: function () {
            console.group('beforeUpdate 更新前状态===============》');
            console.log("%c%s", "color:red", "el     : "   this.$el);
            console.log(this.$el);
            console.log("%c%s", "color:red", "data   : "   this.$data);
            console.log("%c%s", "color:red", "message: "   this.message);
        },
        updated: function () {
            console.group('updated 更新完成状态===============》');
            console.log("%c%s", "color:red", "el     : "   this.$el);
            console.log(this.$el);
            console.log("%c%s", "color:red", "data   : "   this.$data);
            console.log("%c%s", "color:red", "message: "   this.message);
        },
        beforeDestroy: function () {
            console.group('beforeDestroy 销毁前状态===============》');
            console.log("%c%s", "color:red", "el     : "   this.$el);
            console.log(this.$el);
            console.log("%c%s", "color:red", "data   : "   this.$data);
            console.log("%c%s", "color:red", "message: "   this.message);
        },
        destroyed: function () {
            console.group('destroyed 销毁完成状态===============》');
            console.log("%c%s", "color:red", "el     : "   this.$el);
            console.log(this.$el);
            console.log("%c%s", "color:red", "data   : "   this.$data);
            console.log("%c%s", "color:red", "message: "   this.message)
        }
    })
</script>
效果:

总结:
beforeCreate,在实例初始化之后,数据观测(data observer)和 event/watcher 事件配置之前被调用;
created,实例已经创建完成之后被调用。在这一步,实例已完成以下的配置:数据观测(data observer),属性和方法的运算,watch/event事件回调。然而,挂载阶段还没开始,$el 属性目前不可见;
beforeMount,在挂载开始之前被调用:相关的render函数首次被调用;
mounted,el被新创建的vm.$el替换,并挂载到实例上去之后调用该钩子。
beforeUpdate,数据更新时调用,发生在虚拟DOM重新渲染和打补丁之前。 可以在这个钩子中进一步地更改状态,这不会触发附加的重渲染过程。
updated,由于数据更改导致的虚拟DOM重新渲染和打补丁,在这之后会调用该钩子。当这个钩子被调用时,组件DOM已经更新,所以可以执行依赖于DOM的操作。然而在大多数情况下,应该避免在此期间更改状态,因为这可能会导致更新无限循环。该钩子在服务器端渲染期间不被调用。
beforeDestroy,实例销毁之前调用。在这一步,实例仍然完全可用。
destroyed,实例销毁后调用。调用后,Vue实例指向的所有内容都会解除绑定,所有的事件监听器会被移除,所有的子实例也会被销毁。 该钩子在服务器端渲染期间不被调用。
常用的方法:created、mounted。
Vue路由Vue.js路由允许通过不同的URL访问不同的内容。
通过Vue.js可以实现多视图的单页Web应用(single page web application ,SPA)。
Vue.js路由需要载入vue-router库。
代码:
<div id="app">
    <h1>Hello App!</h1>
    <p>
        <!-- 使用 router-link 组件来导航. -->
        <!-- 通过传入 `to` 属性指定链接. -->
        <!-- <router-link> 默认会被渲染成一个 `<a>` 标签 -->
        <router-link to="/">首页</router-link>
        <router-link to="/user">用户管理</router-link>
        <router-link to="/role">角色管理</router-link>
        <router-link to="/system">系统管理</router-link>
        <router-link to="/config">配置管理</router-link>
    </p>
    <!-- 路由出口 -->
    <!-- 路由匹配到的组件将渲染在这里 -->
    <router-view></router-view>
</div>
<script src="vue.js"></script>
<script src="vue-router.js"></script>
<script>
    // 1. 定义(路由)组件。
    // 可以从其他文件 import 进来
    const Home = { template: '<div>欢迎!!!</div>' }
    const User = { template: '<div>user list!</div>' }
    const Role = { template: '<div>role list!</div>' }
    const System = { template: '<div>system list!</div>' }
    const Config = { template: '<div>config list!</div>' }
    // 2. 定义路由
    // 每个路由应该映射一个组件。
    const routes = [
        { path: '/', redirect: '/home' }, //设置默认指向的路径
        { path: '/home', component: Home },
        { path: '/user', component: User },
        { path: '/role', component: Role },
        { path: '/system', component: System },
        { path: '/config', component: Config }
    ]
    // 3. 创建 router 实例,然后传 `routes` 配置
    const router = new VueRouter({
        routes // (缩写)相当于 routes: routes
    })
    // 4. 创建和挂载根实例。
    // 从而让整个应用都有路由功能
    const app = new Vue({
        el: '#app',
        router
    })
</script>
Axios,易用、简洁且高效的http库;
安装:npm install axios
特点:支持node端和浏览器端,同样的API,node和浏览器全支持,平台切换无压力;支持 Promise,使用Promise管理异步,告别传统callback方式;丰富的配置项,支持拦截器等高级配置。
代码:
033.json
{
    "status":200,
    "data":{
        "current":1,
        "size":20,
        "total":4,
        "records":[
            {
                "roleId":1,
                "roleName":"角色1",
                "roleCode":"role1",
                "roleType":"1"
            },
            {
                "roleId":2,
                "roleName":"角色2",
                "roleCode":"role2",
                "roleType":"2"
            },
            {
                "roleId":3,
                "roleName":"角色3",
                "roleCode":"role3",
                "roleType":"3"
            },
            {
                "roleId":4,
                "roleName":"角色4",
                "roleCode":"role4",
                "roleType":"4"

            }
        ]
    }
}
<div id="app">
    <table border="1">
        <tr>
            <td>序号</td>
            <td>角色ID</td>
            <td>角色名称</td>
            <td>角色编号</td>
            <td>角色类型</td>
        </tr>
        <tr v-for="(role, index) in roleList">
            <td>{{index 1}}</td>
            <td>{{role.roleId}}</td>
            <td>{{role.roleName}}</td>
            <td>{{role.roleCode}}</td>
            <td>{{role.roleType}}</td>
        </tr>
    </table>
</div>
<script src="vue.js"></script>
<script src="https://unpkg.com/axios/dist/axios.min.js"></script>
<script>
    var app = new Vue({
        el: '#app',
        data: {
            roleList: []//数组
        },
        created() {
            this.getList(0)
        },
        methods: {
            getList(id) {
                //vm = this
                axios.get('033.json?id='   id)
                    .then(response => {
                        console.log(response)
                        this.roleList = response.data.data.records
                    })
                    .catch(error => {
                        console.log(error)
                    });
            }
        }
    });
</script>