最近就想着学学新东西,转换一下思维,便计划跟着微软官网来实践实践传神的ASP.net core 6.0
环境准备
我本机安装的是:
创建项目
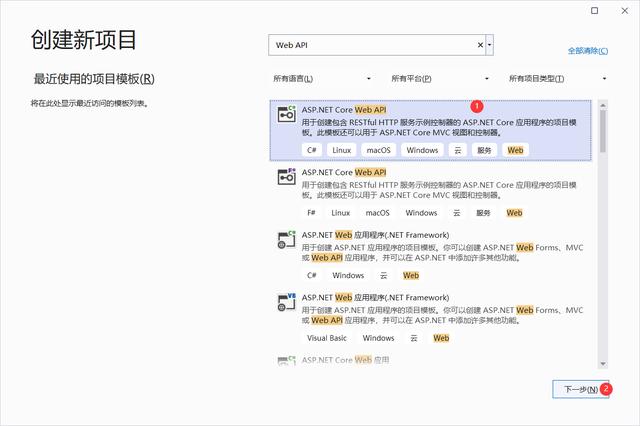
文件->新建->项目,找到并选中ASP.NET Core Web API模板,然后点击下一步,弹出新建项目对话框,输入项目名,点击下一步,


该界面建议选中[启用Docker],当然也可以不选,对于学习ASP.NET Core Web API没什么影响。其他选项默即可,如果要创建Mini API,则无需勾选[使用控制器],然后点击创建

因为我选择了启动Docker,所以会提示安装Docker Desktop的对话框,这里我并不需要它,直接点击否即可。

项目创建成功后,我们可以在Program.cs类中看到,模板会默认启用Swagger

另外,模板会自动创建一个WeatherForecastController.cs的示例类,在该类中我们可以看到该类继承于ControllerBase,并有ApiController和Route两个特性,

现在直接运行起来看看效果


运行起来后,会自动打开浏览器并跳转至swagger页面,这是项目生成时默认设置的,我们可以通过修改launchSettings.json来设置默认启动页面和端口

新建WEB API接口新建实体类
在项目目录中新建一个Models文件夹用于存放实体类,新建一个名为Order类


|
1
2
3
4
5
6
7
8
9
10
11
12
13
14
15
16
17
18
19
|
public class Order
   {
       public long Id { get; set; }

       /// <summary>
       /// 订单编号
       /// </summary>
       public string OrderNo { get; set; }

       /// <summary>
       /// 订单金额
       /// </summary>
       public decimal Amount { get; set; }

       /// <summary>
       /// 订单时间
       /// </summary>
       public DateTime CreateTime { get; set; }
   }
|
创建数据库访问
首先通过NuGet安装Microsoft.EntityFrameworkCore.InMemory,


新建一个名为DemoContext的数据库上下文类并继承DbContext类
|
1
2
3
4
5
6
|
public class DemoContext: DbContext
   {
       public DemoContext(DbContextOptions<DemoContext> options) : base(options) { }

       public DbSet<Order> Orders { get; set; }=null!;
   }
|
在Program.cs中注册数据库上下文
|
1
|
builder.Services.AddDbContext<DemoContext>(opt => { opt.UseInMemoryDatabase("Demo"); }); //Demo为数据库名
|
新增接口
新建一个API控制器,在选中模型后,会安装一些依赖包,我们需要耐心的等待一下


VS会为我们生成比较全的CRUD代码:
|
1
2
3
4
5
6
7
8
9
10
11
12
13
14
15
16
17
18
19
20
21
22
23
24
25
26
27
28
29
30
31
32
33
34
35
36
37
38
39
40
41
42
43
44
45
46
47
48
49
50
51
52
53
54
55
56
57
58
59
60
61
62
63
64
65
66
67
68
69
70
71
72
73
74
75
76
77
78
79
80
81
82
83
84
85
86
87
88
89
90
91
92
93
94
95
|
[Route("api/[controller]")]
[ApiController]
public class OrdersController : ControllerBase
{
    private readonly DemoContext _context;

    public OrdersController(DemoContext context)
    {
        _context = context;
    }

    // GET: api/Orders
    [HttpGet]
    public async Task<ActionResult<IEnumerable<Order>>> GetOrders()
    {
        return await _context.Orders.ToListAsync();
    }

    // GET: api/Orders/5
    [HttpGet("{id}")]
    public async Task<ActionResult<Order>> GetOrder(long id)
    {
        var order = await _context.Orders.FindAsync(id);

        if (order == null)
        {
            return NotFound();
        }

        return order;
    }

    // PUT: api/Orders/5
    // To protect from overposting attacks, see https://go.microsoft.com/fwlink/?linkid=2123754
    [HttpPut("{id}")]
    public async Task<IActionResult> PutOrder(long id, Order order)
    {
        if (id != order.Id)
        {
            return BadRequest();
        }

        _context.Entry(order).State = EntityState.Modified;

        try
        {
            await _context.SaveChangesAsync();
        }
        catch (DbUpdateConcurrencyException)
        {
            if (!OrderExists(id))
            {
                return NotFound();
            }
            else
            {
                throw;
            }
        }

        return NoContent();
    }

    // POST: api/Orders
    // To protect from overposting attacks, see https://go.microsoft.com/fwlink/?linkid=2123754
    [HttpPost]
    public async Task<ActionResult<Order>> PostOrder(Order order)
    {
        _context.Orders.Add(order);
        await _context.SaveChangesAsync();

        return CreatedAtAction("GetOrder", new { id = order.Id }, order);
    }

    // DELETE: api/Orders/5
    [HttpDelete("{id}")]
    public async Task<IActionResult> DeleteOrder(long id)
    {
        var order = await _context.Orders.FindAsync(id);
        if (order == null)
        {
            return NotFound();
        }

        _context.Orders.Remove(order);
        await _context.SaveChangesAsync();

        return NoContent();
    }

    private bool OrderExists(long id)
    {
        return _context.Orders.Any(e => e.Id == id);
    }
}
|
代码中我们可以看到4种接口请求方式HttpGet(查询)、HttpPut(修改)、HttpPost(新增)、HttpDelete(删除),Route中也带有api路径,我们的接口便在api目录下,此时,我们运行起来便可在Swagger中看到刚才新增的接口

我们通过POST请求api/Orders来新增一条数据

再通过GET请求api/Orders来查询数据列表

这里只是跟着官方教程创建好一个项目以及如何创建新的WebApi,示例中的数据是存储在内存中的,下一节,我们便跟着官方教程来学习如果用过EF Core 6访问数据库
,


